Showing posts with label Tricia Maloney. Show all posts

Monday, October 1, 2018

A Special Quilt of Valor and a FREE QUILT PATTERN


Have you heard of Quilts of Valor before? 

Maybe you've even made a quilt and donated it?  


My quilt guild, Free Spirit Quilt Guild (FSQG) got involved with our local QOV chapter in 2017.  Each year we do some kind of community service project and QOV was that year's choice, we were so inspired by the project that we have our own chapter now and it is going strong!

I was all excited to participate last year because many of my family members/friends have served in the military, including my grandpa, Joseph Washick, who served in WWII in the army.  I even submitted a veteran's name (my friend, Ruth's husband, Pat, who served in Vietnam).  Pat was one of the first group of quilt recipients that my guild participated in.

Being all gung ho about QOV, I immediately began my first QOV quilt to donate.  Then I got sick last year, had multiple surgeries, and struggled with complications for the next 12 months.  ARGH!  I went into what I call "emergency quilting" mode, which basically meant that I only quilted when I had to (had a quilt with a deadline).

I am thrilled to say that I am finally on the homestretch to finishing my QOV  from last year.  I just need to hand-sew little bit more binding.

 Recently, I had an amazing experience with my QOV.   The Moving Wall was set up in the park in my local town.  I had the brilliant idea to take my quilt with me to see The Moving Wall.  I asked permission to photograph my quilt with The Wall.  Two very kind veteran volunteers helped me, I wish I would have thought to get their names.


Here are the directions to make my Triple Rail Fence quilt for QOV.  
Maybe you'll make one and donate it to your local QOV chapter.
 ___________________________________________________________________________________

 Patriotic Rail Fence Quilt
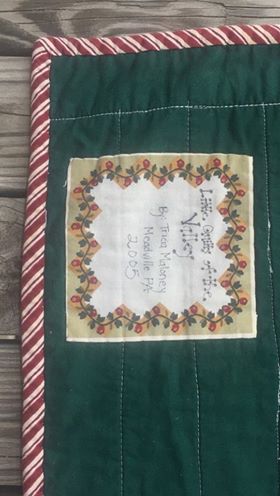
By Tricia Maloney

63" x 81"


SHOPPING LIST


1 7/8 yard Red Fabric

1 7/8 yard White Fabric

1 7/8 yard Blue Fabric

5/8 yard fabric for binding

Twin-sized batting

5 yards fabric for backing

**You can totally use your stash for this quilt, just use an assortment of reds, whites, and blues.**


CUTTING


Red Fabric:  Cut 72 rectangles 3 1/2" x 9 1/2"

Light Fabric:  Cut 72 rectangles 3 1/2" x 9 1/2"

Blue Fabric:  Cut 72 rectangles 3 1/2" x 9 1/2"

Binding Fabric:  Cut 8 strips 2 1/2" x the width of fabric (WOF)


MAKING THE BLOCKS


1.  Sew a blue, a white, and a red 3 1/2" x 9 1/2" rectangle together into a Rail Fence block.  Make 72 blocks. The blocks will be 9 1/2" x 9 1/2" (unfinished).


MAKING THE QUILT


2.  Sew 7 blocks together, turning every other block as shown.  Make 5 rows (Row 1).


3.  Sew 7 blocks together, turning every other block as shown.  Make 4 rows (Row 2).


4.  Sew the rows together, alternating placement (Row 1, Row 2, Row 1, Row 2, Row 1, Row 2, Row 1, Row 2, Row 1).


 5.  Layer your quilt top with your batting and backing.  Quilt the layers together.  Bind your quilt.

6.  Give your quilt to a Veteran!


Please feel free to share this pattern with your Quilt Guild or sewing group.  
It goes together fast, is a great size for a QOV quilt, and is suitable for a beginner.

Quilt On!


Sunday, September 23, 2018

Busy Busy Busy

I've had blogging on my to-do list for the last couple weeks and just haven't quite gotten to it.  So I decided that I was going  to start this week out right and blog on Sunday.  LOL!

I thought I'd show you some recent publications featuring some of my quilt projects.   Most likely you can find them at your local shop but I've included the links to the publications on the Annie's online catalog just in case.

1.  Terrific Table Toppers.  Fun and seasonal toppers (which means table runners and table quilts).  My quilt, An Apple a Day, is on page 28.  There are 9 projects in this lovely little book that retails for $9.99 at your favorite quilt shop OR you can find it HERE -- there's even a digital download version if you prefer.


2.  Exclusively Annie's Patterns.  These are individual patterns which are mostly fast and easy and beginner friendly.  Here are my two most recent ones:  Visions Table Topper (left) and Nursery Rhymes (right).  Aren't they fun?  You can find these two patterns and a lot more HERE.


3.  Annie's Christmas Special Interest Publication (SIP).   I just saw this at local stores this past week.  It won't last very long -- there are 70+ projects ranging from quilting (of course) to crochet to knitting.  My Christmas Stars Runner is on page 22 and the matching place mats are on page 20.  Grab this one when you see it, it retails $9.99.


4.  Autumn Colors.  Get your harvest on since it's now the first day of Fall.  Time to head to your sewing space and make some cozy and fun projects for you and your loved ones.  I have several quilts featured in this one:  Color Cascade (page 12), Trick or Treat (page 16),  Harvest Star (page 92), Color Play (page 95), Modern Harvest Runner and Place mats (page 98).  Whew!  I'm getting tired just writing all of them down.  You can get it at your local shop or HERE.


Doesn't Fall just make you want to burrow in your sewing room and sew something?  These great publications will offer you lots of inspiration and options. 


Go forth and SEW!

Wednesday, September 5, 2018

Getting With the Program..............Quilt Program That Is

After a year long battle with a bunch of health-related issues, I am finally getting back to some semblance of normalcy.  Okay, I've never been very normal (just ask anyone who knows me), but things are finally returning to some kind of balance in my life now.  What a relief!

This past week I had 2 different programs.  I think the last program I did was a Schoolhouse at Spring Market in St. Louis 2017, which was a couple months before the rug was pulled out from beneath me.

My first program was at my very own quilt guild, Free Spirit Quilt Guild (FSQG).  I did a program about using orphan quilt blocks for our year-long theme of Quilting Around the House.  I showed many quilts from my first book, Orphan Block Quilts, quilts featured in magazines, and even some quilts I made just for fun (Imagine that!).  I also shared lots of tips and tricks for finding, cleaning, and using those orphan quilt blocks that seem to multiply overnight sometimes.  I showed lots of different orphan block projects from one block pin cushions and pillows to a large bed quilt featuring multiple groupings of coordinating blocks.


Here's me!  I am holding a copy of my book and talking about the long process of getting a book published (people always find this interesting).  Psst!  Over my left  shoulder you can see my book cover quilt, Lavender Green.

Here's the cover of my first book, Orphan Block Quilts.  It's out of print now, but there might still be some copies floating around.  If you're interested in adding this book to your bookshelf stop on over to my website and order a signed copy today!


Below, are some more photos of the quilts I showed.  Looking at the number of quilts I lugged to the program, I don't know how I managed to get them all into 2 crates!


This little Americana orphan quilt was my very first orphan block quilt!  I used 4 Four Patch blocks from the 1930's and added a border of 2 reproduction 1930's reds.  Isn't it sweet?  You can see why I got addicted to making quilts with orphan blocks, can't you?


____________________________________________________________________________________

My second program was a trunk show/book signing at a local quilt shop, Quilter's Cupboard, which was celebrating its first year anniversary.  I was invited to show off my quilts from my most current book, I Love Precut Quilts!  Copies of this book are still out there, but if you're interested in a signed copy, swing by my website.

Sadly, I realized that my quilts hadn't been out of the crates since last spring, probably right after getting home from Spring Quilt Market.  Poor babies.  They still had their identification labels on from visiting C&T for their beauty shots.

Here's my third book -- my fun book!


 Here is Spritely, probably the most popular quilt in my book!

 Big Bow Ties -- giant-sized bow tie blocks.

This is Chautauqua, the quilt on the cover of my book.  

 Here's Around and Round.  A fun, fast throw quilt.  

This is a close up the machine quilting for Around and Round. 
 I am particularly proud of my artsy feathers!

 Here you see Cocktail Party and City Houses.

This is Divide and Conquer and Bounce.


It's good to be back in the groove again!  I wonder what kind of quilt mischief I'm gong to get into next?  Stay tuned...........

Thursday, August 30, 2018

Something I Always Wanted...

This past week end, I was very excited to go to one of my favorite fun places -- Lisa's General Store (previously Lisa's Indoor Flea Market) located in Greenville, PA.  Over the years, I have found lots of different treasures, particularly quilt-related treasures -- antique and vintage quilt blocks, fabric, a blue and white double Irish Chain quilt from circa 1920 for an unbelievable price (I won't tell you because you would be so jealous!), vintage sewing boxes, etc.  Of course, there's always non-quilting stuff like books, clothing, food, and just about everything you could imagine and some things  you probably couldn't imagine.

Anyway, on Sunday, I finally found something that I have wanted for a long time and was able to bring it home!  YAY!


A vintage Martha Washington Sewing Cabinet!

It's not perfect and needs some TLC, but it is charming and very functional.  The two front drawers give lots of space for notions and thread -- there are even floating trays in the drawers for small stuff.  On each side on the top there is a hinged lid! When lifted up they reveal a good-sized cubby for stashing projects, materials, or snacks -- maybe chocolate.....

Of course, I did some looking online to see if I could find anything out about this particular type of stand, and was happy to find lots of photos and information.  

1). Apparently, Martha Washington did have a work table, but it looked nothing like this.  Using Martha Washington's name was an advertising ploy.

2). This type of sewing table was based on Federal style tables and became popular during the Depression years as an inexpensive piece of factory-made furniture.  You could buy one in the Sears and Roebuck catalog!

That being said, I discovered that my stand is somewhat unusual, which makes me think it was of a higher quality.  It only has 2 drawers where most of the ones I saw had 3 drawers.  It has really nice detailed metal drawer pulls instead of knobs.  AND it is on a pedestal instead of wooden legs -- and the feet of the pedestal have metal tips with disks underneath to protect the floor.

Of course, my table wouldn't be worth much to anyone but me because it has a broken foot that was 
glued.

Here are some other quilty things I found at Lisa's.  Please enjoy...... 


Monday, August 20, 2018

Returning After a LONG Hiatus........And a Quilt Story

Greetings,

First I want to apologize for dropping out of the blog world for the last 7 months.  I won't go into the boring details, but suffice it to say that due to many complications from my gallbladder surgery last year, I had to let a lot of things slide this year, blogging being one of those things.


Have you ever wondered where the quilts go that you've gifted, donated, or sold over the years? 


I have.  Just last week a very interesting thing happened that I'd like to share with you.  I had a message from someone I did not know on Facebook Messenger.  Of course, I am always cautious when getting messages from an unknown person, but this one seemed harmless enough.  It said something like:

"Have you ever heard of Little Quilts in the Valley in Meadville, PA?  Quilts and runners made in 2005......is that you?"

What an odd message!  So I decided to reply.  Yes, that was me.  Before I became "The Orphan Quilter" with the publication of my first book, Orphan Block Quilts in 2010, I often wrote "Little Quilts of the Valley" on my quilt labels.  As a side note, I must admit to not always adding labels to my quilts, but this experience will ensure that I always do add a label to each and every quilt that I make from this point forward.  Maybe it will convince you of the importance of labeling your quilts, too.

 Here's the cover of my book.  
Stop by my website if you're interested in getting your own copy.

The mystery messenger quickly replied to my message and we started a conversation.  It turns out that the messenger's daughter, Savannah, found one of my table runners in a thrift shop in Boone, North Carolina!  Savannah, being a quilter like her mom, rescued the runner and gave it a home.

Here is the table runner I made back in 2005!  I remember this one.  I think I made 2 of these runners, giving one as a gift and selling the other one, I think (or else donating it to charity).  I wonder which one this quilt is.


Here's a close up of the back, showing my label!  Notice the wiggly "straight" machine quilting lines -- I used the "quilt as you go" method for this one.  I know that I only made a few of those type of projects before I abandoned the method in favor of my usual free motion quilting.

I wonder what happened to the runner from 2005 when I made it until when it was adopted by Savannah.  Oh, if only quilts could talk........

Special thanks to LG and Savannah for reaching out on Facebook and sending me the photos.  Sew glad my humble runner found its way to you.

Anyone out there have a similar quilt story to share?

Thursday, January 25, 2018

Scrap Stash Management

I am finally sitting down and writing my first blog for 2018.  It's funny how fast time flies.  Do you have this problem too?  Sometimes I wish the merry go round of life would slow down so that I could get off once in a while, even if it's only to take a deep breath and look around.

I had good intentions the beginning of January to get my quilting studio cleaned and ready for a new year of creating quilts and other fabulous items.  My cutting table was an absolute horror -- in order to cut anything, I had to remove piles of quilts, fabrics, and who knows what else was hiding there.  With all of the medical issues that I had in the second half of 2017, my quilting took on a PRIORITY ONLY status, which did not include putting things away unless I absolutely had to.  So, I ended up with one big giant mess.

The first thing that I did was to clean off my cutting surface.  I had a lot of fat quarters, yardage, and scraps to sort.  I folded and put the yardage and fat quarters away in their proper homes.   Now I can cut without moving a bunch of stuff. Time to move on to the pile of scraps.  Or should I say the first pile of scraps.


Everyone has their own system for dealing with the leftovers from their quilt projects.  What's yours?

 Mine has so many levels and if I can think of any way to make it more difficult or complex, you know that's the way that I would do it of course.  LOL!

Okay, here's what I do:

1)  If any scrap is less than 2 1/2" square, then it goes right into the trash.

2) As I sew, I toss strips and small pieces larger than 2 1/2" into a basket to be cut into usable pieces later.

3)  Large pieces sometimes get folded and placed by color in my fabric museum drawers.  Yes, I do indeed have a fabric museum now, don't you?

4)  If I'm working with a specific collection, I put everything together into a gallon-sized bag, box, or basket so that I can find them when I want to make another project with that collection (at least that's the general idea -- whether I can find the bag, box, or basket later is usually by chance in my studio).


 Once my basket of scraps gets full enough, then it's time to cut them up into usable pieces.  Since I do a lot of designing arund stand precuts, I tend to cut my scraps into the following:

Fat Quarters

10" squares

5" squares

2 1/2" squares

2 1/2" strips that are the width of the fabric 


Here is what my pile of scraps looked like after I cut it up.


Nice, huh?  Now I can add these to my overflowing stash of scrap precuts.  Then they will be ready when I want to put together something scrappy.  Hmm.  Maybe I'll pull out a copy of I Love Precut Quilts! and make some scrappy versions of the quilts.


Speaking of my book, I Love Precut Quilts!, did you know that Amazon has been selling copies at a deep discount?  If you haven't gotten your own copy yet, now's a great time.  Here's the link to find my book (paperback and ebook) on Amazon:  Buy I Love Precut Quilts!

If you already have a copy of my book and you liked it, maybe you'll leave me a positive review on Amazon, too. 

Did you make anything from my book?  Email photos to me -- I'd love to share them with my blog readers.


Sunday, November 12, 2017

It's a ROAD RALLY! 100 Quilt Block Tour November 2017

Hi!  Sew glad you stopped by. 

I hope the traffic wasn't too bad.

Come on in and make yourself comfortable.

A cup of tea, perhaps?

I'm very excited to be part of Quiltmaker Magazine's 100 Quilt Blocks Volume 16 Road Rally Blog Tour.  My block, Tortoise Love, is Block #1540.


********************

Let me tell you a little bit about myself.  My name is Tricia Maloney and I'm a quilt designer, author, and teacher.  I've written three books and my designs have been published in many of your favorite quilt magazines.  I also teach at my local quilt shops here in lovely northwestern Pennsylvania and design/make quilts for fabric companies on occasion.


 One of my latest fun adventures is designing Rose Cards for Villa Rosa Designs.  Here are my first two designs.


******************** 

I had a lot of fun coming up with my Tortoise Love quilt block.  You'll have to keep reading to find out about my inspiration for this cute block.  I love that it is a multi-technique block featuring 4 pieced Drunkard's Path blocks and a little bit of applique for the head and tail.

I decided to play a little bit with my Tortoise Love block to see what I could come up with using my Electric Quilt 7 software.  (Did you know that EQ8 is out now?  I just found that out.)

Here's a fun throw quilt I'm calling "Tossed Tortoise."


Isn't this fun?  Can't you see yourself making this cutie for your favorite tortoise (or turtle) lover?  You could make the tortoises all the same fabric or even lots of different fabrics. The squares in the chain could all be different fabrics, too. This would be a great scrap-buster quilt.

I thought about playing around with a table runner design, but I wasn't sure that I would want tortoises on the table at dinner time.  LOL! 

So instead, I went totally crazy and came up with the following design, "Rainbow Tortoises."


What do you think of this one?  I'm not quite sure I love the rainbow tortoises concept, but I do like the movement that's created by the tortoises holding hands (or paws? or feet?).

But if you're not a tortoise lover, you might like this version instead:


Cool, huh?  Interesting shapes that connect add a lot of interest to this version of the design.  Here it is as a big bed quilt:


Isn't this version interesting?  By limiting the fabric choices, you get a bold unique repeating design.

********************

Okay, now let me tell you about the inspiration for this fun and versatile quilt block.

Meet Carl.


Isn't he just too cute for words????  Carl is a 2 year old African Sulcata tortoise.  When my niece, Morgan, adopted him, he was about the size of a toy car.  He's really grown.  Of course, he loves to eat.  Strawberries are one of his favorite treats.

He'll grow to be gigantic and will outlive Morgan, so she will have to make plans for his distant future.  But in the meantime, Carl loves to go on family vacations, walks, and meet new friends.


There's nothing better than a tortoise and his girl!


********************

NOW FOR THE GIVEAWAY!

The Prizes:

1. One lucky winner will win a copy of Quiltmaker's 100 Quilt Blocks volume 16.  YAY!

        2.  Another winner will receive my first 2 Rose Card patterns and a mystery surprise.  WOW!

        3.  The final winner will win a copy of my new pattern, Basket Weave. SUPER DUPER!

And who knows?  I might add a few other prizes if I get lots of encouragement!!!!


 Here's how it works:
 You have up to 3 chances to win.  Lucky you!

1.  Leave a comment on this blog and tell me what you would name your pet tortoise if you had one.
2.  Become a blog follower and leave a comment on this blog telling me you that you're a blog follower.
3. Follow me on Instagram @tricia.maloney and leave a comment on this blog telling me you're an Instagram follower.

Ready!  Set!  GO!

You have from Monday, November 13th until Saturday, November 18th to participate. 
 Winners will be selected randomly on Sunday, November 19th.


PLEASE MAKE SURE TO INCLUDE YOUR EMAIL ADDRESS 
SO THAT I CAN CONTACT YOU IF YOU WIN!