Showing posts with label scrap fabric. Show all posts

Monday, January 21, 2019

2019 New Year's Goal -- Reclaiming My Studio Part 3............Scraps

Yay!  Tricia 1...................Scraps 0.

I had posted about my scraps on Instagram earlier this month  and a kind follower suggested that I join the 2019 Scrap Buster Challenge by Border Creek Station.

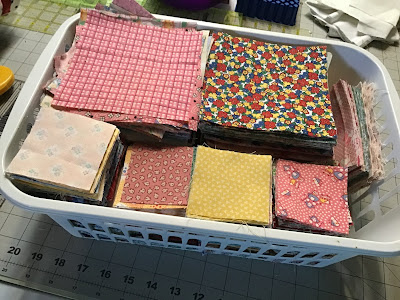
It sounded intriguing so I checked it out and I joined the fun!  This was just the thing for my basket of 1930's squares (see below) -- I just needed to add a white solid.  Easy Peasy!


The goal for the Scrap Buster Challenge is to make at least 52 blocks in 2019, which averages out to 1 block a week.  This sounded very manageable to me -- I know I can do this.  Besides, I can always work ahead so when a week is too crazy for me to sew, I can skip a week when needed.  AND it will use up some of my scrap fabric.  Win-win!


Here is my first Scrap Challenge Block.  It's not perfect, but I'm okay with that.  I gave up the idea of quilting perfection long ago.


I was so inspired by my first block that I made 3 more blocks the second week. I  posted my 4 humble blocks on the Scrap Challenge FB page and one of the other participants pointed out that I had sewn one of the HST blocks in each of the three blocks wrong.  She kindly said something about being curious to see how my variation turns out.  GULP!  I totally missed that.  Hmmm.  Time to "unsew" some seams and fix the 3 blocks.

Here are my repaired blocks.  As you can see, I decided not to do a ton of "unsewing" and used the wrongly-pieced HSTs to make 3 more blocks!  Now I have 7.  45 blocks to go.


It's not too late you you to join in the fun.  Just hop over to the Border Creek Station website for more information.  Bring a friend.

With my quilt studio bursting at the seams will fabric, I have decided that 2019 is going to be my YEAR OF SCRAP QUILTS.

So, not only am I going to blog about my Studio Cleaning Adventure, but now I'm going to add scrap quilts to the mix.  The good thing is that I should always have something to blog about.  The bad thing is that you are going to get tired of reading about my studio and my scrap quilts. 

Did you miss the first part of my Reclaiming my Studio series?  Click HERE.


Monday, January 14, 2019

2019 New Year's Goal -- Reclaiming My Sewing Studio Part 2

Well, I'm not dead yet.

I am now approaching my second week of RECLAIMING MY STUDIO and I'm still alive.   

This past week, I focused on 2 things in my studio because my time to work in there is quite limited AND I want to use a bit of that time for sewing, too:

1.  Cutting up scraps into usable squares and rectangles

2.  Putting my homeless quilt stuff into baskets and bins for right now


Cutting Up My Scrap Fabrics 

I had this really big zip top plastic bag of 1930's odd-sized pieces and scraps smaller than a fat quarter.  I had cleaned these out of my 1930's drawers last year but never got back to them.  So now is the time.


So I jumped right in!

Word of advice -- when cutting a lot of scraps into squares and strips, start with a fresh rotary cutter blade.  A new rotary cutter blade will make cutting easier and more comfortable and ultimately faster.

I just started pulling wads of fabric out of the bag.  I pressed and layered larger pieces to be made into 5" squares and then the smaller stuff I pressed and layered to cut 2 1/2" squares.  I kept at it diligently and finally, when I thought I couldn't take all those cute happy 1930's reproduction fabrics anymore, I miraculously emptied that bag of 1930's repros.  WHEW!


As quilters, for some strange and unknown reason, we are afraid to throw away even the teeniest scraps of fabric -- OMG,  what if there's a fabric shortage in the world???

I've actually moved a bit beyond this after 20+ years of quilting.  (Did I actually admit to that in writing?)  In my perfect studio (cue the dreamy music), ALL my scraps have been rendered into 5" squares, 2 1/2" squares, and 2 1/2" WOF strips and are organized in pretty labeled bins.  You've seen these studios on Pinterest, right?

I don't think I need to go to the extent of organizing my cut up scraps by color or theme, though, because when I want to use them, I'll just delve right in and ransack those pretty bins to find the pieces that I want.

Believe it or not, but piles, bags, and bins of tangled scrap fabrics actually take up more space than neatly cut squares and strips (another reason to get my scraps under control).

There are many books out there to help you get the most out of your scraps, a few of my favorite are:


Of course, there are also lots of great blog posts with great tips and suggestions.  It doesn't hurt to do a little research/reading because if you're like me you need to know 2 things -- I'm not alone and somebody out there might know the secret to permanently getting my scraps under control and might even be willing to share.


Basket and Bins and Crates, Oh My!

I spent some time sorting through my piles of stuff and plopping things that had no specific home into baskets and bins to be dealt with later -- when I build my dream sewing/cutting table with 1001+ cubbies (yes, I found myself sliding into an alternate reality here), I'll hopefully have places to put all this orphaned stuff.

WOW!  Abracadabra!  Can you believe it?? Already, my space looks cleaner without jumbled piles of who-knows-what all over my horizontal surfaces.  I was even able to put some things away!

I found lots of precuts hiding in dark corners of baskets and bins, so I am in the process of rescuing them and putting them either in my precut drawer (charm packs and mini charms) OR my crate with fat quarter bundles, Jelly Rolls, Layer Cakes, and some other precut odds and ends -- hexagons, triangles, etc.  I really had no idea that I had so many precut bundles....

Yes, I admit it -- I am a precut hoarder [head hanging in shame....].

While putting things in temporary housing, I poked around my existing baskets and bins.  So, of course I found lots more fun things and again, even rehoused some of them already.  GO ME!  (You have to be your own cheerleader, you know.)

I also found more scraps that need to be cut into strips and squares.  Go figure, back to my cutting mat -- which is much easier to find now, by the way.

Stay tuned for my next Cleaning Adventure.

If you missed my first post about cleaning my studio, click HERE

Thursday, January 25, 2018

Scrap Stash Management

I am finally sitting down and writing my first blog for 2018.  It's funny how fast time flies.  Do you have this problem too?  Sometimes I wish the merry go round of life would slow down so that I could get off once in a while, even if it's only to take a deep breath and look around.

I had good intentions the beginning of January to get my quilting studio cleaned and ready for a new year of creating quilts and other fabulous items.  My cutting table was an absolute horror -- in order to cut anything, I had to remove piles of quilts, fabrics, and who knows what else was hiding there.  With all of the medical issues that I had in the second half of 2017, my quilting took on a PRIORITY ONLY status, which did not include putting things away unless I absolutely had to.  So, I ended up with one big giant mess.

The first thing that I did was to clean off my cutting surface.  I had a lot of fat quarters, yardage, and scraps to sort.  I folded and put the yardage and fat quarters away in their proper homes.   Now I can cut without moving a bunch of stuff. Time to move on to the pile of scraps.  Or should I say the first pile of scraps.


Everyone has their own system for dealing with the leftovers from their quilt projects.  What's yours?

 Mine has so many levels and if I can think of any way to make it more difficult or complex, you know that's the way that I would do it of course.  LOL!

Okay, here's what I do:

1)  If any scrap is less than 2 1/2" square, then it goes right into the trash.

2) As I sew, I toss strips and small pieces larger than 2 1/2" into a basket to be cut into usable pieces later.

3)  Large pieces sometimes get folded and placed by color in my fabric museum drawers.  Yes, I do indeed have a fabric museum now, don't you?

4)  If I'm working with a specific collection, I put everything together into a gallon-sized bag, box, or basket so that I can find them when I want to make another project with that collection (at least that's the general idea -- whether I can find the bag, box, or basket later is usually by chance in my studio).


 Once my basket of scraps gets full enough, then it's time to cut them up into usable pieces.  Since I do a lot of designing arund stand precuts, I tend to cut my scraps into the following:

Fat Quarters

10" squares

5" squares

2 1/2" squares

2 1/2" strips that are the width of the fabric 


Here is what my pile of scraps looked like after I cut it up.


Nice, huh?  Now I can add these to my overflowing stash of scrap precuts.  Then they will be ready when I want to put together something scrappy.  Hmm.  Maybe I'll pull out a copy of I Love Precut Quilts! and make some scrappy versions of the quilts.


Speaking of my book, I Love Precut Quilts!, did you know that Amazon has been selling copies at a deep discount?  If you haven't gotten your own copy yet, now's a great time.  Here's the link to find my book (paperback and ebook) on Amazon:  Buy I Love Precut Quilts!

If you already have a copy of my book and you liked it, maybe you'll leave me a positive review on Amazon, too. 

Did you make anything from my book?  Email photos to me -- I'd love to share them with my blog readers.