Showing posts with label organizing your quilting studio. Show all posts

Monday, March 25, 2019

An Update on My Studio Makeover Project

Well, I am stalled right now on my studio overhaul.  Sigh.....

You know when you ask someone to help you and then he/she gets busy and doesn't have time to help you?  AND the project is half-done and you don't know how to finish it yourself?

Well, that is where I find myself right now.

I have actually purged a lot of stuff out of my studio.  Of course, now that I've put stuff in plastic baskets in anticipation of have storage cubes, there's no place to put the basket right now.

Regardless of that dilemma, my studio looks like a different place, still disorganized, but neater and less cluttered.

Here's some update photos for you.


Granted, I still have a long ways to go before I can consider myself organized, but I'm at least on the yellow brick road now.

I was so energetic about this project last month, but my father got too busy to even think about my new electrical outlet and wooden post.  I even ordered my storage cube units for the base of my new sewing table.


Once I have the electricity in then I can  build my new sewing table.  It will actually have a 4' x 6' surface as well as 24 cubes underneath.  There may even be a space for some large and bulky items too -- I won't know until I start putting the cube units together. 

But pretty much everything has come to halt.  For now.

Monday, January 14, 2019

2019 New Year's Goal -- Reclaiming My Sewing Studio Part 2

Well, I'm not dead yet.

I am now approaching my second week of RECLAIMING MY STUDIO and I'm still alive.   

This past week, I focused on 2 things in my studio because my time to work in there is quite limited AND I want to use a bit of that time for sewing, too:

1.  Cutting up scraps into usable squares and rectangles

2.  Putting my homeless quilt stuff into baskets and bins for right now


Cutting Up My Scrap Fabrics 

I had this really big zip top plastic bag of 1930's odd-sized pieces and scraps smaller than a fat quarter.  I had cleaned these out of my 1930's drawers last year but never got back to them.  So now is the time.


So I jumped right in!

Word of advice -- when cutting a lot of scraps into squares and strips, start with a fresh rotary cutter blade.  A new rotary cutter blade will make cutting easier and more comfortable and ultimately faster.

I just started pulling wads of fabric out of the bag.  I pressed and layered larger pieces to be made into 5" squares and then the smaller stuff I pressed and layered to cut 2 1/2" squares.  I kept at it diligently and finally, when I thought I couldn't take all those cute happy 1930's reproduction fabrics anymore, I miraculously emptied that bag of 1930's repros.  WHEW!


As quilters, for some strange and unknown reason, we are afraid to throw away even the teeniest scraps of fabric -- OMG,  what if there's a fabric shortage in the world???

I've actually moved a bit beyond this after 20+ years of quilting.  (Did I actually admit to that in writing?)  In my perfect studio (cue the dreamy music), ALL my scraps have been rendered into 5" squares, 2 1/2" squares, and 2 1/2" WOF strips and are organized in pretty labeled bins.  You've seen these studios on Pinterest, right?

I don't think I need to go to the extent of organizing my cut up scraps by color or theme, though, because when I want to use them, I'll just delve right in and ransack those pretty bins to find the pieces that I want.

Believe it or not, but piles, bags, and bins of tangled scrap fabrics actually take up more space than neatly cut squares and strips (another reason to get my scraps under control).

There are many books out there to help you get the most out of your scraps, a few of my favorite are:


Of course, there are also lots of great blog posts with great tips and suggestions.  It doesn't hurt to do a little research/reading because if you're like me you need to know 2 things -- I'm not alone and somebody out there might know the secret to permanently getting my scraps under control and might even be willing to share.


Basket and Bins and Crates, Oh My!

I spent some time sorting through my piles of stuff and plopping things that had no specific home into baskets and bins to be dealt with later -- when I build my dream sewing/cutting table with 1001+ cubbies (yes, I found myself sliding into an alternate reality here), I'll hopefully have places to put all this orphaned stuff.

WOW!  Abracadabra!  Can you believe it?? Already, my space looks cleaner without jumbled piles of who-knows-what all over my horizontal surfaces.  I was even able to put some things away!

I found lots of precuts hiding in dark corners of baskets and bins, so I am in the process of rescuing them and putting them either in my precut drawer (charm packs and mini charms) OR my crate with fat quarter bundles, Jelly Rolls, Layer Cakes, and some other precut odds and ends -- hexagons, triangles, etc.  I really had no idea that I had so many precut bundles....

Yes, I admit it -- I am a precut hoarder [head hanging in shame....].

While putting things in temporary housing, I poked around my existing baskets and bins.  So, of course I found lots more fun things and again, even rehoused some of them already.  GO ME!  (You have to be your own cheerleader, you know.)

I also found more scraps that need to be cut into strips and squares.  Go figure, back to my cutting mat -- which is much easier to find now, by the way.

Stay tuned for my next Cleaning Adventure.

If you missed my first post about cleaning my studio, click HERE

Monday, January 7, 2019

New Year's Resolutions........Or Not? Reclaiming My Studio Part 1


If you're anything like me, you're ready to hit the ground running now that it's a brand new year. 

Here is a wonderful quote by Brad Paisley that really resonated with me -- 

"Tomorrow is the first page of a 365 page book.  Write a good one." 

 I've been looking forward to 2019 for a little while now.  2017 and 2018 were definitely NOT my years so I have great hopes for 2019.

Before New Year's I made a decision not to make New Year's Resolutions.  Most years I do write a few resolutions.  Usually they are the typical ones -- eat healthier, lose some weight, etc. -- which of course, like most everyone else,  I've abandoned by February or March.  So what do I do with the rest of the year?  Continue my bad habits, that's what!

So I decided that 2019 was going to be a different year -- a better year.  This year instead of resolutions, I am making GOALS, more like a bucket list, I guess you could say.

In my opinion you either have success or failure with a resolution where you can spend all year working towards a goal.  I like the way that sounds, don't you?  Life is a work in progress anyway.

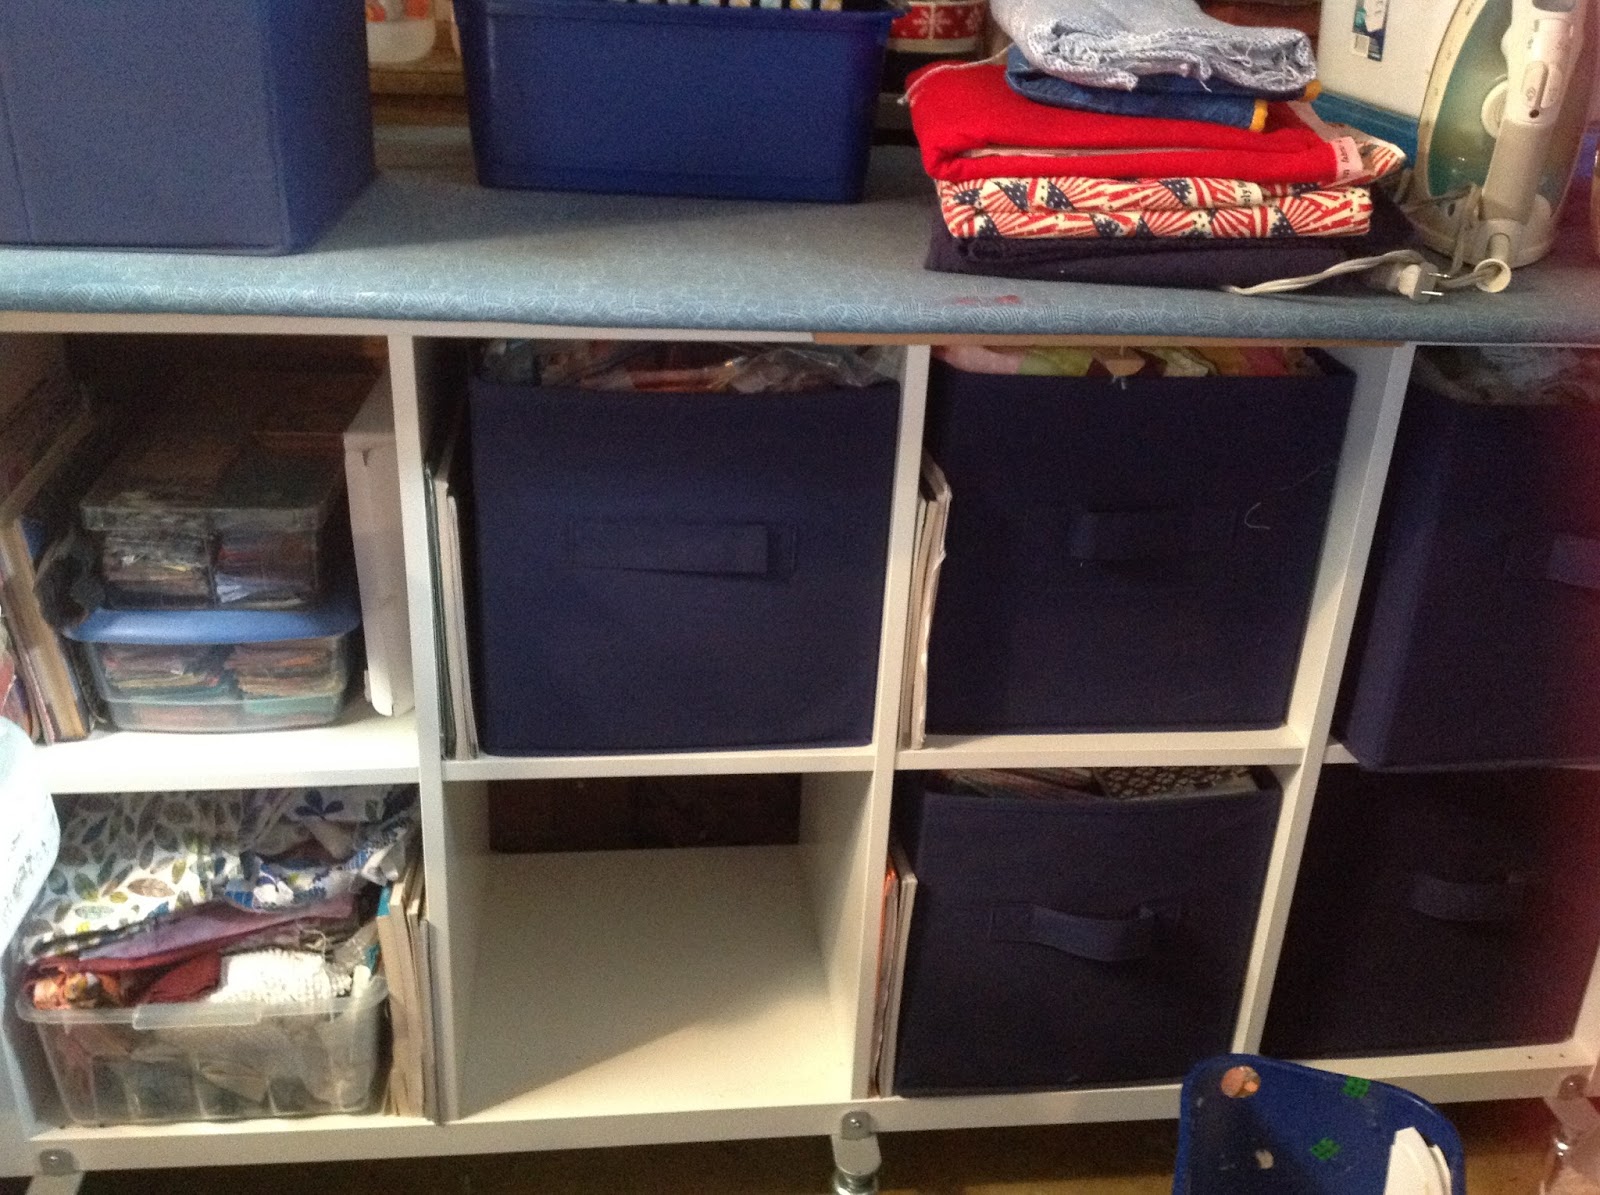
One of my BIG goals is to clean, organize, and purge my sewing space. ARGH!  I know what you are thinking, but YES I CAN DO THIS!  You can too if that's one of your goals.

STEP 1  PANIC!

Yes, I panicked.  I looked -- really looked -- at my studio and suddenly had no idea what to do or where to start.  Yeah, I admit, my sewing studio is a pretty scary place and looks like a quilt shop threw up in there.  GULP!


 So what did I do?  I started small.  I had 2 tote bags filled with goodies from Quilt Markets I attended in 2016 and 2018.  Most of it was assorted precuts mixed up with a few other things.


There's a lot of really fun stuff in those bags, but I can't enjoy them shoved haphazardly into tote bags.

So, I took everything OUT.  I sorted them by precut type.  I decided that I would put my charm packs and mini charms in my precut drawer since I seem to use these more frequently and the fat quarter bundles, Jelly Rolls, Layer Cakes, etc. I layered in a storage crate for right now.  Hopefully, as I purge stuff that I don't need or want anymore, I will find a better solution for ALL of my precuts.  But for now, this is a good start.


 STEP 2  Find a good organizing book

Yesterday, I scoured Amazon and found what looked like a great organizing book.  It's called Real Life Organizing:  Clean and Clutter-Free in 15 Minutes a Day

I thought -- WOW -- in 15 minutes a day I can turn into Martha Stewart.  I downloaded the ebook and started reading right away.  THIS BOOK MAKES ME GIGGLE!  Cass Aarrsen is a real hoot.  I immediately identified with her on several levels.  I really think this is an organizing book that I can work with.  BTW, I am a BEE (to find out what this means, get yourself a copy and read it).

STEP 3  Come up with a Personal Reward

Now that I'm all hyped to roll up my sleeves and dive in (Yes, I realize that things will get worse before they get better), I decided that what I really needed to stay motivated with this project (which may possibly take the rest of my life) was some kind of reward.

This made a lot of sense to me because I spent years and years bribing young children to clean up, sit down, go outside, come inside, use the bathroom, eat their vegetables, etc. by using a classroom reward system.  Have you ever seen the power of the Treasure Box???

So I need my own Quilter's Treasure Box.  It could be a series of small rewards but I decided that it will be a great big reward -- I'm worth it, don't you think?

Right now my sewing machine table and cutting table are a mash up of pieces of furniture not used by my family.  I adore my cutting table which is the bottom of an antique Hoosier cabinet (no top, sorry).  My machine sewing table is a vintage piece with a side extension that I can put up if needed.  BUT they don't match in style nor do they match in in height which can make machine quilting larger projects more difficult.

My Big Reward is going to be...........................


A BRAND SPANKING NEW SEWING AND CUTTING TABLE MADE OUT OF STORAGE CUBES!  

GO ME!

Stay tuned for more updates about my project!


Monday, June 13, 2016

In Between Projects....and a Little Marketing

Well I'm off to a good start on the Marketing front.  I decided to start by contacting the wonderful companies who gave me fabric/batting/tools/etc. to use for the book.

Riley Blake Designs
Moda (United Notions)
Camelot
Robert Kaufman
Cotton + Steel
Fiskars
Roc-Lon
Mary Ellen Products
Enmart
Fairfield World

Hmm.  I think that was all of them.  I've heard back from several already AND I have even talked to a couple on the phone to brainstorm ideas.  I'm still waiting to hear from several of them, so I'll probably contact those ones again in case they didn't receive the email or whatever.

I've started talking to a couple magazines too, but I've barely scratched the surface on this avenue and need to get back to it.

I am definitely going to host a blog hop with C&T.  I've already received the guildelines and info.  F-U-N!  I had such a fun time participating in the Quiltmaker Magazine 100 Quilt Block Volume 13 tour that I wanted to do it again, but this time the focus will be my book, of course.

__________________________________________________________

While I was waiting for my box of fabric for 3 magazine projects, I decided to do a little cleaning in my studio.  What an interesting experience, to say the least.  I did a little re-arranging along the one wall and then started sorting and organizing a bit.  OH MY!  What a lot of stuff I had scattered around my space.  I found notes from my first book, Orphan Block Quilts, which released in 2010.  Not to mention all of the scraps of paper from magazine pieces and just little notes that don't mean anything now.  Ugh!  Apparently I have a paper problem.

One of my favorite things to do with 8 1/2'' x 11'' sheets of paper that only have printing or writing on one side is to cut the paper into quarters and use the clean side for notes.  I even do this at the library where I work.  Too bad we can't wash paper, huh?

Anyway, here are a few photos from my "dungeon" studio.  My studio is located in the back corner of the basement.  I keep trying to steal a little bit more space as everything seems to multiply when I'm not looking....LOL!


What a mess!  See the stack of papers?  Those are from my first book!

 One of my favorite pieces in my studio -- my moveable giant ironing station with storage.  I worked on actually putting things in the bins.  Hidden clutter, YAY!


This is where I store my usual basic yardage.  Folded with an 8" ruler so everything is uniform.  Divided by color.  I also have some collections housed by themselves -- fat quarters (also organized by color), 1930's reproductions, 1800's reproductions, Christmas, Fall/Halloween, Patriotic, and PRECUTS (of course!).


Here's another view of my storage wall.  AND there's my amazing sewing machine and BFF -- my Janome 8900.  Too bad about the exposed concrete floor though, huh?

As I was cleaning up and re-organizing, I also found a lot of items that I didn't want anymore so I got those ready for an upcoming garage sale.  You know.....I must help to fuel the underground quilting movement.

Of course I was just getting into the cleaning groove when my box from Moda came today.  Here's a peak inside my box.  Ho hum.  It figures, doesn't it?  Hopefully I'll get back to it before another 6 years passes.