Tuesday, October 8, 2019

Tricia's Favorite Quilt Blocks -- Block 11 FAR WEST

Oh my gosh!  I just realized that this is block 11.  Wow!  This project is fast coming to an end.  Then we'll have to start a new project.  I was thinking something with Christmas.  What do you think?

Our 11th block

Far West


It's actually called by several names (as most blocks are), but I decided to call it by its first name, Far West.  This block is attributed to Nancy Cabot.  Other names include Path and Stiles, Shoo Fly, and Stiles and Paths (according to EQ Blockbase).  You can definitely see its resemblance to our Shoo Fly block, but the center Nine Patch and the strips make it look entirely different.  That is one of the the things I love the most about quilting and designing -- by changing a few little things I can get an entirely new design.

Sew, let's get started making this block, which will finish at 12".

Here's What You Need:

Light -- 2 squares 4 7/8" x 4 7/8", 4 rectangles 1 7/8" x 4 1/2", and 4 squares 1 7/8" x 1 7/8"

Medium -- 4 rectangles 1 7/8" x 4 1/2" and 1 square 1 7/8" x 1 7/8"

Dark -- 2 squares 4 7/8" x 4 7/8" and 4 squares 1 7/8" x 1 7/8"


Let's Sew It Together:

1.  Layer a light 4 7/8" square with a dark 4 7/8" square.  Draw a diagonal line from one corner to the opposite corner.  Sew 1/4" on both sides of the drawn line.  Cut apart on the drawn line.  Open and press to yield 2 triangle squares.  Make 4 triangle squares.


2.  Sew 4 dark, 1 medium, and 4 light squares together into a little Nine Patch as shown.  Make 1.


3.  Sew a white rectangle on each side of a medium rectangle.  Make 4.


4.  Now that you've got all of the sections made, it's time to put them together, just like a Nine Patch block.


Well done!  Bravo!  Kudos!


Stay tuned for Block 12 coming soon and after that, I will provide instructions for my quilt layout which will measure 56" x 74".

Monday, September 30, 2019

Going to the Quilt Show!

Sometimes I get too wrapped up in the business side of quilting and forget why I ever started quilting in the first place. 

If you've been following my blog, then you already know that I took a break from making quilts this summer and had sew much fun rediscovering all of the wonderful antique and vintage fabrics, blocks, and quilts that I have accumulated over the years -- some items predate before I even began quilting.

With that in mind, I decided it was time to go to a quilt show just for fun.  It's been years since I've done this -- it was way overdue.

I went to Erie PA for the Quilting on the Bayfront show. The last time I went to this show was several years ago when it was the first time in this venue and I was disappointed.  It wasn't because of the show that I was disappointed, but because the show sponsored by Millcreek Sewing and Fabric previously had been held at the Chautauqua Institution in NY.

Quilting Around Chautauqua was my favorite experience (yes it wasn't just a show, it was an experience) because three friends and I used to rent a cottage and would spend five days immersed in quilting, the ambiance of Chautauqua, and friendship!  I really miss that.

So when the show changed venues, it made me very sad. 

Fast forward a couple years and I was ready to see the show with different eyes. 

So off I went to the quilt show!

The quilts greet you right after you pay your admission fee in the central hallway.  The backdrop behind the quilts was a wall of windows overlooking Lake Erie.  The ship you see here is the USS Flagship Niagara.


The show was set up in a large single room with quilt displays from area guilds lining the walls and vendors in the middle.

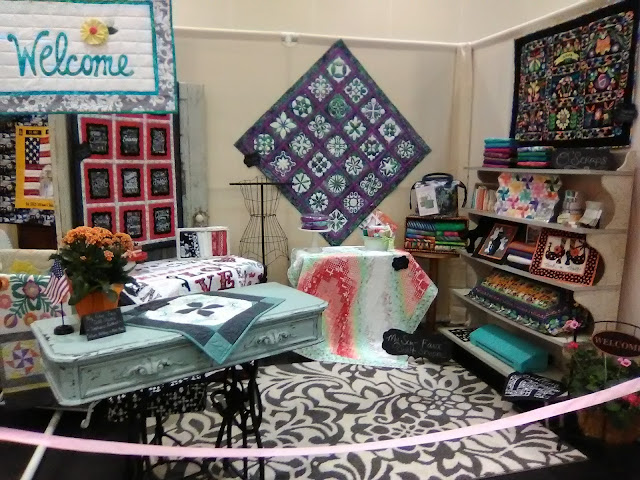
At the back of the room were some awesome quilt displays set up as rooms. 

The first one is a "quilt shop" vignette.  I apologize, but I didn't take a photo of the quilter's name.  Nonetheless, I found it very charming.


This next displays were created by my longtime friend and amazing quilter Marcy Scott, who also works at Millcreek Sewing and Fabric.


I had a wonderful surprise after I started perusing the vendor booths -- I discovered my friend Leslie was there too!  I don't know why we didn't communicate with each other and go together.

Another friend, Cathey, of Cathey Marie Designs, who is the creator of the Y Block Ruler, was there vending for the first time.  She said she did at least 100 demos during the show!  Here she is doing her ruler demo to a group of eager quilters.


Leslie and I teamed up for shopping and egged each other on.  Although she had already made the rounds of the vendors, she humored me and visited them all again.  Along the way, we stopped and chatted because many of the vendors were old friends.  We also met a lot of new friends who were vendors, too.

I had a great time and even picked up some fun charm packs and a wooly sheep pattern (along with an assortment of felted wools).

I am definitely looking forward to next year's show.  Maybe I'll see you there!


Monday, September 16, 2019

Tricia's Favorite Quilt Blocks -- Block 10 SAWTOOTH STAR

By now you've probably noticed that I like Star blocks as I've included several different stars in this Sampler quilt.

Why Stars?

Stars add a lot of movement to quilts AND there are so many different stars and variations out there to explore.  Star Blocks are also some of the oldest known quilt block patterns, too.

So, YES, Stars!

Our 10th block this time is:

Sawtooth Star

which is one of the earliest Star block patterns.  
Have you ever made a Sawtooth Star?


Isn't this a great Star block?  I love the large unpieced center -- perfect for adding a fussy cut fabric OR you could add a smaller block in the center.  Sigh......Sew many ideas, sew little time......

Here's how to make a 12" finished Sawtooth Star block:

What you need:

Light fabric:  4 squares 3 1/2" x 3 1/2" and 1 square 7 1/4" x 7 1/4" -- cut this large square on both diagonals to get 4 triangles

Medium fabric:  4 squares 3  7/8" x 3 7/8", cut these squares on 1 diagonal to get 8 small triangles.

Dark fabric:  1 square 6 1/2" x 6 1/2" (you can fussy cut this square OR even replace it with a pieced 6 1/2" x 6 1/2" square -- maybe a 4 patch or 9 patch or even a smaller star)

Put the Block Together:

1.  Sew a medium triangle to each side of a background triangle.  Make 4 units.


 2.  Sew a light square to the ends of the unit from step 1.  Make 2.


3.  Sew a unit from step 1 to each side of the center 6 1/2" square.  Make 1.


4.  Now sew the block together like a 9 Patch with the center unit from step 3 sandwiched between the units from step 2.


 DONE and DONE!


Monday, September 9, 2019

Early Honeybee Quilt Blocks — MUST SEE

As I’ve mentioned in earlier posts, I have spent most of the summer exploring my vast antique and vintage textile collection, which includes yardage, scraps, quilt blocks, quilt tops, and quilts.  When I started this project, I really had no idea the sheer magnitude of the undertaking — I am amazed and delighted with the stuff I have collected and hoarded over the years. Recently I shifted my focus from yardage and scraps to quilt tops and quilt blocks.  While shifting through a large crate of quilt blocks, I rediscovered this set of three antique Honeybee blocks and I knew I had to share them because they are sweet and naive and utterly delicious!

These blocks are pretty early, but because the fabrics are solid turkey red and chrome yellow, it’s hard to pinpoint an exact date, but I estimate them to be around 1840-1870 due to the turkey red/chrome yellow combination.  I think the chrome yellow looks like it might have been a home dyed yellow, but I don't know for sure.

I am including photos of all three blocks as well as the back of one of the block so you can see the handwork, too.  Now I’m going to let the blocks tell you their story.


 So, what do you think of these blocks?  Aren’t they wonderful? 

I really wish there were four blocks, because with only three, there isn’t much that I can do with them.  I am considering framing them and displaying them together side by side. I think that would be very eye catching.

If you had these three blocks, what would you do? I appreciate the ideas. Thanks!

Monday, September 2, 2019

Tricia's Favorite Quilt Blocks -- Block 9 FRIENDSHIP STAR

We're three-quarters of the way through my Favorite Quilt Block Sampler!  It won't be long until we put all 12 of our blocks together into a fun Sampler Quilt.  If you missed the first 8 blocks, you can find the block links along the left side of my blog.

Friendship has always been an important part of quilting.  I bet you have quilting friends and get together to do all sorts of things together.  Maybe you go on shop hops or to quilt shows, maybe you head to the nearest outlet mall, or maybe you have sewing days together.  Whatever you do, make sure to enjoy spending time with your quilting friends.

Block 9 for my Favorite Quilt Block Sampler is the sweet

Friendship Star 


I like that the Friendship Star block has a lot of variations.  Variations means unending options and design potential.  Here are a few good examples of what I'm talking about.  Both the quilts below alternate with a Nine Patch quilt block.  But that is where the similarities end.  The first quilt is set in straight rows while the second quilt is set on point.  Changing color values/fabric can also make a big impact on your quilt design.


Here's What You Need:

Light:  2 squares 4 7/8" x 4 7/8"

Medium:  4 squares 4 1/2" x 4 1/2"

Dark:  1 square 4 1/2" x 4 1/2 and 2 squares 4 7/8" x 4 7/8"

Make the Block:

1.  Layer a light 4 7/8" square with a dark 4 7/8" square.  Draw a diagonal line from one corner to the opposite corner.  Sew 1/4" on both sides of the drawn line.  Cut apart on the drawn line.  Open and press to yield 2 triangle squares.  Make 4 triangle squares.


2.  Assemble block like a Nine Patch with the medium 4 1/2" squares in the corners.  Pay close attention to which way the triangle squares are pointing.


3.  DONE!

Monday, August 26, 2019

Even More Mini Quilts!

Recently, our Mini Quilt Group met again after taking a break over the summer.  Two members actually completed their "homework" -- 100 half-square triangles that finish at 1" square.  One of them even quilted and bound their quilt.  WOW!  You go, Mary Lee!


The gold and blue below one belongs to Gaynel.
 

  Mine is the red and blue one below with the folded up corner.


August's Project 

Our project for this month was a pair of pin cushions from our book, Vintage Patchwork by Pam Buda. I didn't want to overwhelm everyone after a month off and following our HUGE 12" HST mini.


I was kind of surprised that some of the group memebers had never made a pin cushion so we took a little time to talk about what to do after you made your little pieced pin cushion top.

HOW TO FINISH A PIN CUSHION


  • If you are planning to quilt your pin cushion top, then layer the top with a light batting (I don't usually use a piece of backing fabric when I quilt a pin cushion because it will have a bottom piece later).  Pin or press the layers together.

  • Machine or hand quilt as desired.   As we are talking about a 5" square, you'll want to choose a simple quilting pattern like stippling or wavy lines.  Straight line or quilting in the ditch work too.  You could also explore some of your special stitches on your sewing machine.

  • After quilting, square up your pin cushion top/batting.

  • Place a piece of backing fabric right sides together with the pin cushion top.  Pin the edges if you need to.

  • Leaving an opening that is at least a few inches in length, stitch all the way around the outside.

  • Clip the corners and turn right side out through the opening.

  • STUFF your pin cushion.  There are lots of different materials that you can stuff your pin cushion with, I do not suggest you stuff it with rice or beans or another food item as it might drawn insects.  STUFF your pin cushion until you can't stuff it any more then stuff it a little bit more.  My favorite stuffing tool is a chopstick.

  • Whip-stitch the opening closed.

  • Voila!  A pin cushion.

Monday, August 19, 2019

Tricia's Favorite Block Tutorials -- Block 8 CHURN DASH

It's time for Block Number 8 in my Favorite Block Tutorials.  I hope that you've been following along and maybe even trying out some of these fun blocks.

Here are the links for the previous 7 blocks if you have missed one:

Block 1

Block 2

Block 3

Block 4

Block 5

Block 6

Block 7

Now that you're all caught up, let's make Block 8 --

Churn Dash


The Churn Dash Block is an old favorite of mine.  I have made many quilts using this block.  One of my most interesting ones was called Halloween Dash and was published in Quilter's World Magazine some years ago.

 
Can you see the spiderweb machine quilting motifs in the middle of the big Church Dash blocks?  Aren't they sew cute?

What you need:

Light:  2 squares 4 7/8" x 4 7/8", 1 square 4 1/2" x 4 1/2", and 4 rectangles 2 1/2" x 4 1/2"

Medium/Dark:  2 squares 4 7/8" x 4 7/8" and 4 rectangles 2 1/2" x 4 1/2"

Here's what you do:

1.   Layer a light 4 7/8" square right sides together with a medium/dark 4 7/8" square.  Drawn a diagonal line from one corner to the opposite corner.  Sew 1/4" away from both sides of the drawn line.  Cut apart on the drawn line.  Open triangle squares and press.  Make 4 triangle squares.


2.  Sew a light 2 1/2" x 4 1/2" rectangle long sides together with a medium/dark 2 1/2" x 4 1/2" rectangle.  Make 4.


3.  Sew the block together like a Nine Patch.


4.  And you're done!