Monday, July 1, 2019

In a Cleaning Mood -- Destashing Vintage Fabric

As part of my Studio Overhaul, I knew I'd have to address my overabundance of fabric sometime.   Of course, my electricity isn't finished yet and I don't have my new sewing table constructed, but I am still limping along on my project.  I started in January if you'll remember, and now it's the end of June, but hey, who's counting?  As long as I keep moving forward, I feel successful.

So anyway, I decided to tackle some of my accumulation of fabric.  I am going to try to downsize my fabric collection by 33%.   Part of the reason I decided to start now is because I am on the lookout for feedsack fabric for a presentation for my guild sometime in the future.

This time I chose a big heavy crate filled with vintage fabrics and maybe some blocks and who knows what else I hid in there.  I have several such crates in different locations, so it's kind of hard to know exactly what I've got.  Yes, I guess I am a bit of a hoarder, but I do come by it quite naturally.

It was fun opening up the crate to find out what was in there.  I found tons of vintage fabrics and scraps as well as a few aprons and some assorted blocks.   Here's a couple stacks of fabrics out of my crate:


Fun, huh?  There are a lot of different prints and patterns and the fabrics seem to range form the 1930's -- 1970's.

After three or so days, I am still going through the crate.  I have a bag of yardage and scraps that I will be parting with as well as a big bag of precut 2" squares from the 1960's/1970's which I am not that excited about -- I like larger pieces that I can use to repair quilts from the same era.

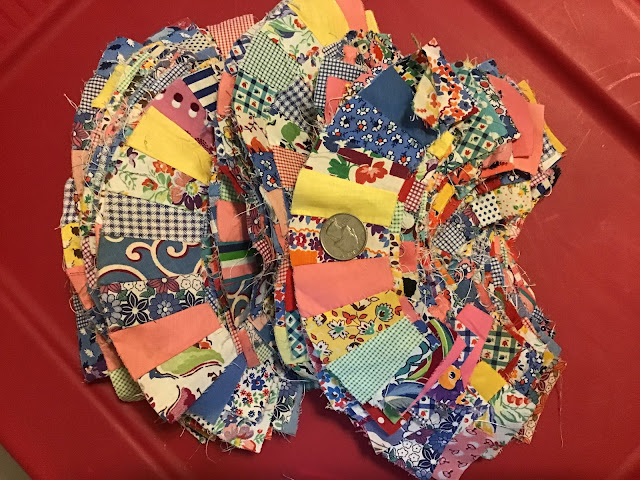
Today I was sorting through a gallon-sized baggie I had in the crate and was amazed to find a giant stack of arcs which were both hand and machine-pieced.  I'd guess them to be from the 1940's, but there are a lot of 1930's fabrics mixed in.  These arcs are really tiny, see the quarter in the photo.  There must be like 100 of them!  I think they are arcs from a Double Wedding Ring that was started and never finished or else some kind of Fan design.  What are your thoughts on these blocks?


In the bag, there were wedges for Dresden Plate blocks and even some butterfly wings and bodies.  What a fun collection!

A cool thing I discovered was that there were several fabrics in that bag that were the same design, but different colorways.


 I plan to play in my fabrics again tonight. I wonder what I'll find next........


Monday, June 17, 2019

Tricia's Favorite Block Tutorials -- Block 5 ELECTRIC FAN

Here are the links to the first 4 blocks in this series if you missed them:


Block 1 -- Shoo Fly

Block 2 -- Courthouse Steps

Block 3 -- Flying Geese

Block 4 -- Rail Fence


Our next block is the Electric Fan!


I think this block looks complicated, but it really isn't.  If you look closely, you can see that it is a 4 patch block in disguise -- 4 Hour Glass blocks turned this way and that.

This quilt block was included in a booklet called Practical Needlework:  Quilt Patterns in 1906.  The design was contributed by Clara Stone. (This information from The Electric Quilt Company BlockBase.)


What You Need:

2 white squares 7 1/4" x 7 1/4"

1 dark blue square 7 1/4" x 7 1/4"

1 medium blue square 7 1/4" x 7 1/4"


Here's What to Do:

(Please note that there are several ways to make Hour Glass units.  You can find many different tutorials online.)

1.  Cut all 4 squares on both diagonals. 


2.  Sew a dark blue triangle to a white triangle.  Make 4.


3.  Sew a medium blue triangle to a white triangle.  Make 4.


4.  Sew a dark blue unit to a medium blue unit to make an Hour Glass unit.  Make 4 units.


5.  Sew the 4 Hour Glass units together, turning as shown.

 And that's it!


Here's a quilt made with 20 Electric Fan blocks.  Isn't it great?  I love how crisp it looks with just 3 fabrics.  Wouldn't it be fun to scrap it up, though?  This would be an awesome scrap-buster!


 Go forth and make Electric Fan Blocks!


Wednesday, June 12, 2019

More Mini Quilts!

Are you sick of Minis yet?  I hope not -- they seem to be really hot right now.  Have you looked in any quilt magazines lately?  You're sure to find at least one mini quilt featured, but often more.  Pin cushions are also hot and you can find them everywhere.  Of course, a pin cushion is really just a tiny quilt, isn't it?

So, have you jumped on the mini bandwagon yet? 

Oops!  I just realized that I never did a blog post about our previous class in May.  Well, let me get you up to date!

Last month we explored different ways to make half square triangles.  What's your favorite technique for making HSTs?  Before this month, I would have said the usual using two squares RST and sewing 1/4" on both sides of a diagonal lone then cutting them apart on the diagonal line.  But now I must say that I'm liking the 4 at a time method.  You can find the tutorial here at Blossom Heart Quilts.  

Our project in May was a tiny little Bear Paw quilt about the size of a coaster with 1/2" finished HSTs.


At this month's meeting, everyone showed off their projects so far.  A few people are already behind (this was our 4th class).  But luckily, we do not meet in July so they will have an extra month to get caught up.  Tehehe!  Yeah, right, I know.

Here are some of the Little Log Cabin quilts from April as well as tiny Bear Paw quilts from May.  Aren't they wonderful?


Of course, they'll need the extra month when they get started on this month's project which requires 100 tiny HSTs!

If you like our mini quilts, you can find them in Pam Buda's book, Vintage Patchwork.  You, too, can make your own Mini Masterpieces!


Monday, June 3, 2019

Tricia's Favorite Block Tutorials -- Block 4 RAIL FENCE

If you missed the first 3 blocks in my Favorite Block Tutorial series, here they are:

Block 1 -- Shoofly

Block 2 -- Courthouse Steps

Block 3 -- Flying Geese

Now that you're all caught up, let's make Block 4 -- RAIL FENCE.  Rail Fence was one of the first quilt blocks that I ever made.  Mine only had 3 strips whereas this block has 4 strips in each section.

As you know, I like to add a bit of Quilt History to my Block Tutorial posts.  Have you ever wondered where the names for quilt blocks came from?  I have always found this subject fascinating.  Blocks were named for people, special events, political figures and events, common everyday things and activities -- just about anything you can imagine! 

Have you ever noticed that quilt blocks can have a lot of different names, though?  I find that even more fascinating because people in different places were creating the same quilt blocks and calling them something different, based on their own experiences. When quilt block names were published in magazines and newspaper, even more names were added to the list.  For example, look at the Churn Dash block.  It is also known as Monkey Wrench, Puss in the Corner, Love Knot, Hole in the Barn Door, Sherman's March, Indian Hammer, Fisherman's Reel, and several other names.

If you find this as interesting as me, you might want to check out Barbara Brackman's Encyclopedia of Pieced Quilt Patterns.  It is an amazing resource with thousands of pieced quilt blocks, their names, and even the publications they appeared in.  It can be hard to find, so if you are an Electric Quilt user, you should invest in BlockBase, which is a digital version of Barbara Brackman's book.  BlockBase doesn't include all the blocks in the book, but it does have a great selection.

Sew, let's get started on Block #4 -- Rail Fence.

 For a 12" finished block, you will need the following:

4 background rectangles 2" x 6 1/2"
4 light rectangles 2" x 6 1/2"
4 medium rectangles 2" x 6 1/2"
4 dark rectangles 2" x 6 1/2"

(For this block I chose to go with a monochromatic color scheme, but you can make this block as scrappy as you want because anything goes.)

1.  Sew a background, light, medium, and dark 2" x 6 1/2" strip together.  Make 4 units.


2.  Sew the 4 units together into a 4 Patch block, turning units as shown.


And that's it!  This a great beginner block, but it has a lot of possibilities for more experienced quilters, too.


Here are some ideas to get your creative juices flowing:


Thursday, May 30, 2019

My Villa Rosa Rose Cards Are Popping Up in the Most Unexpected Places!

Well, hello again!  No, I haven't forgotten about you.  Honest.  Things have just been super busy around here.  I'm sure you can relate.  :)

I missed 2 weeks in a row this time, but I do actually have a very legitimate reason -- my family had a giant garage sale (no we weren't selling the actual garage, you silly goose!) over Memorial week end.  Whew!  I am so glad that it is over.  I had forgotten how much work went into preparing for a garage sale.  I think we spent 2 weeks (or was it 5 years???) getting everything cleaned, priced, arranged, etc.  It wasn't one of our best sales, but I guess it wasn't our worst either, either.

Anyway, while I was getting ready for the garage sale, my friend Cathey Laird skipped off to Spring Market in Kansas City, MO.  Lucky girl!  She sent me the following advertisement image in a message:


This is an ad for the Top 25 Patterns at Moda.  Check out the third pattern down on the left side -- YES!  It is my Salt Water Taffy Rose Card pattern for Villa Rosa!  YIPPEE!  Wow, was I surprised when she messaged it to me -- she really made my day.

Out of curiosity, I went to Moda's website and looked under their books and patterns section.  Again, I was surprised to find most, if not all, of our Villa Rosa Rose Cards, including ALL of my designs.  This is so mind-boggling and exciting.  (You can't see me right now, but I am doing my happy dance as I write this post.)

I never know where my designs and patterns are going to show up next.

Monday, May 13, 2019

Tricia's Favorite Block Tutorials -- Block 3 FLYING GEESE

Are we having fun yet?

Hopefully you have made Block 1 -- Shoo Fly and Block 2 -- Courthouse Steps.  If you missed them, please go back and get caught up:

Block 1 -- SHOO FLY

Block 2 -- COURTHOUSE STEPS

Now that we're all on the same page, let's try our hand at a FLYING GEESE variation.


This variation is called Dutchman's Puzzle.  According to the website Quilting in America, the Dutchman's Puzzle block design has been around since the late 1800's.  The site doesn't list much information about the block, but does note that it is reminiscent of Dutch windmills, so perhaps that's where the name came from.

Okay, let's get started!

There are a lot of different ways to make a single Flying Goose unit, including different rulers made especially for making that one unit, so you might want to explore some quilt books or other Internet tutorials for other options.

I am going to show you how to make Goose units using squares and rectangles -- NO TRIANGLES!

For a 12" finished block, you will need the following:

16 background squares 3 1/2" x 3 1/2"
4 dark rectangles 3 1/2" x 6 1/2"
4 medium rectangles 3 1/2" x 6 1/2"

1.  Layer a background square right sides together (RST) with a medium (or dark) rectangle.  Draw a diagonal line as shown from the bottom corner to the opposite top corner of the square.  Sew on the line. 


2. Trim 1/4" beyond the sewn line, flip the background triangle open and press.


3.  Repeat steps 1 and 2 on the other side of the rectangle with another background square.  Now you have a single Flying Goose unit.  (Hint:  Save all you cut off triangles and make a mug rug or a small pillow.)


4.  Make 4 Goose units with medium/background and 4 units with dark/background.


5.  Sew a dark Goose to a Medium Goose.  Make 4 sets.


6.  Sew the double Geese units together into a Four Patch configuration, turning the units as shown in a clockwise rotation.


And it's that simple!  Now you have a 12 1/2" (12" finished) Dutchman's Puzzle block.


Thursday, May 9, 2019

Local Quilters in the Same Publication!

Dang!  I ruined my streak of writing a weekly blog post last week.  Oh well, I'm going to get myself back on track.

I just had to share this awesome story with you.

Recently, I received my author copy of the book, Farmhouse-Style Quilting, which is a compilation of the work of many quilt designers.  The book was created by Annie's Quilting.


 To buy your own copy of the book, go HERE.  It is available as a book or an ebook.


I was fortunate to have 2 projects accepted for the publication --

Red-Letter Day Place Mats p.9

and

Wash Day p. 29

My Wash Day Quilt made the front cover of the publication.  If you look closely at the wooden crate under the bench, you can see my quilt peeking out.  (Tehehe)

Wash Day was quilted by one of my favorite local long arm machine quilter's, the very talented Karen Shields of Karen's Quilting Studio.

The design for Wash Day came to me pretty quickly once I found the Moda collection Oxford by Sweetwater.  The fabrics reminded me of my Grandpa and his quilt, which I inherited after he passed away.  The quilt was made by his mother -- my great grandmother -- when he was a young man before he married my grandmother.  It is one of my most treasured items, even though it is faded and worn.  (I promise to add a photo of the quilt to this post when I get the chance.)

Here's the back of the book.  You can see both my projects there!


Anyway, another of the designs in the Farmhouse-Style Quilting book is by my friend and fellow designer, Cathey Laird.  You might know Cathey from her ruler, the Firefly Glow Y Block Ruler.  Cathey's design is called Country Stars Runner.


Okay, what's really neat is that another one of my friends and fellow quilters, Kristine Smith, also had a quilt featured in this book.  Her quilt is called Country Comfort and it was machine quilted by another friend, Debi Crocker.  Kristine's quilt is also on the back cover of the book.


As they say on info-mercials --
but wait -- there's more!

All five of us -- 
Karen, Cathey, Kristine, Debi, and me -- 
live right here in northwestern PA 

AND WE ALL BELONG TO 
THE SAME QUILT GUILD! 

Holy Guacamole, Batman!  Can you believe it???