Showing posts with label quilt with a view. Show all posts

Monday, July 22, 2019

Tricia's Favorite Block Tutorials -- Block 7 OHIO STAR

Hello Again, Dear Friends!


I hope everyone is having fun with these quilt block tutorials.  In case I didn't mention it before, I plan to do 12 block tutorials and then I will do a tutorial on putting the 12 blocks together into a throw-sized Sampler Quilt!  So stick with me and you'll have a pretty nifty quilt when we're all done.

Here are the links for the first 6 blocks if you're just joining us:

1.  Shoofly

2.  Courthouse Steps

3.  Flying Geese

4.  Rail Fence

5.  Electric Fan

6.  Eccentric Star


Okay, now that that's out of the way, let's jump right into our next block: 

OHIO STAR


  Did you know the Ohio Star Quilt Block is connected to John Brown, the abolitionist??????  

Hop over to Suzy Quilts to read more.


Here's what you need for one 12" (finished) block.


Dark Fabric:  1 square 5 1/4" x 5 1/4", cut on both diagonals to yield 4 triangles

Medium Fabric:  2 squares 5 1/5" x 5 1/4", cut on both diagonals to yield 8 triangles

Light Fabric:  1 square 4 1/2" x 4 1/2"

Background Fabric (white):  4 squares 4 1/2" x 4 1/2" and 1 square 5 1/4" x 5 1/4", cut on both diagonals to yield 4 triangles

Let's Sew it Together! 

1.  Sew a light triangle to a dark triangle.  Make 4.


2.  Sew a background triangle to a medium triangle.  Make 4.


3.  Sew the units from steps 1 and 2 together to make an Hourglass unit.  Make 4.


4.  Sew a unit from step 3 together between 2 white squares.  Make 2. 

5.  Sew a light square between 2 units from step 3.  Make 1. 

6.  Sew the rows together into an Ohio Star block.  SEW SIMPLE!


That wasn't too hard, was it????

Stay tuned for our next Block Tutorial in a couple weeks.

Know a friend who might enjoy this tutorial?  Please share.


Monday, November 28, 2016

And the Winners Are.......


Well, folks, the winners have been notified, and all six of the prizes have been claimed and shipped.

I want to thank everyone for joining us on the Blog Tour.  It was tons of fun, wasn't it?  Although I was on the Blog Tour, I really enjoyed reading the designer blogs every day too.  What a lot of talented people there are!

Our Quilt With a View lucky winners were from all over the United States:

Marie from Texas

Vivian from North Carolina

Wanda from Iowa

Sue from Ohio

Brenda from Wisconsin

Nicole from Washinton


I have submitted blocks to volumes 15 and 16, so keep your fingers crossed that my blocks will be selected and we'll get to Blog Hop again in the spring.

In the meantime, keep on quiltin'!


Monday, April 18, 2016

Spring Weather Brings.....Christmas Quilts????

After months of craziness, I am hopeful that my world is going to stop spinning for a while!

And while I enjoy this little calm in the storm of my crazy mixed-up life,  I thought I'd try blogging again.

________________________________________________________________________________

As I sit here on this balmy April evening with the window open, the overhead fanning humming away, and the peepers (tree frogs) singing their very loud opera outside, I can't help but shake my head over my recent projects for Quilter's World magazine:

WINTER AND CHRISTMAS!


What?  You might ask.  What's wrong with you?  Are you nuts?

Probably, but in the meantime allow me to explain.

When it comes to designing for magazines or other publications for that matter, you are never making seasonal and holiday items during the correct time/season.  Strange, I know, but how else can the magazine/publication bring your your seasonal/holiday issues unless they're doing the upcoming winter issue in the spring and next year's spring issue in the summer? 

This may sound strange, but I take comfort in the fact that the seasons and holidays still follow in the correct order, just at different times of the year.

Okay, so right now I'm working on a set of Christmas place mats, a snowman table runner, and a snowflake table runner.  Right now.  In April.

Believe it or not, but there is an upside to working on seasonal/holiday items out of time -- by the time the season or holiday rolls around, I've already got a stash of new quilts ready to display, give as gifts, or donate to my favorite charity.  Just sayin'........

Here are some photos of Winter and Christmas quilts that I've made over the last couple years for various publications and patterns.


Sunday, October 25, 2015

My First Tutorial! QUILT BLOCK WOOD-BURNED ORNAMENT

My apologies for not getting to this sooner, but I was unable to spend much time on my computer for the last couple weeks due to an eye procedure.  I am healing well and almost back to my normal self, but with better eyesight.

I've been thinking about Christmas a lot lately, and have started making lists of what I want to make for gifts, what I have that needs finished, and what I need to buy.  Do you do that too?  I am definitely a list-y kind of person.

This week, I had some fun playing around with my new wood-burning tool and I thought you'd all enjoy trying out this cute quilty Christmas ornament.  If you do make one, please email me photos so I can post them.  :)

littlequilts@windstream.net

Soooooo, anyway, here's my first tutorial:

QUILT BLOCK WOOD-BURNED ORNAMENT 

Step 1:   Gather your supplies.

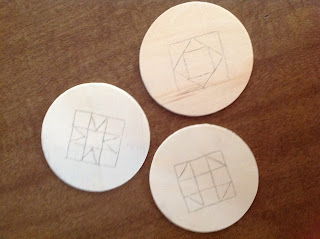
You will need wooden disks (mine are about 3"), a wood-burning tool, transfer paper, small quilt block line drawings (I used Electric Quilt software to make mine and they are about 1 1/2"), and a pencil (I love these stubby little pencils that I got from Ikea!).


Step 2:  Transfer the design.

Okay, now it's time to use your pencil and transfer paper to get the quilt block design onto the wooden disk.  Put your transfer paper down first, try to center your quilt block line drawing on top, and trace the lines with your pencil.


Step 3:  Burn the design.

After heating up your burning tool for the correct amount of time (hint:  look at your instructions), trace over the quilt block lines with your tool.  You may need to go over the lines more than once until you reach the right amount of burning.  Move slowly.


Step 4: Fill in the design.

Once you've burned the lines, very carefully burn the areas that you want to be the "darker fabric" in the block. You may need to burn the areas more than once to get them dark enough.  I even lightly burned the "light fabrics" because I like the look.  I also added a "fuzzy" edge around the block.


Step 5:  Burn the edges.

After you are satisfied with your block, burn the edges of the disk if desired.  I really like how it makes the block more rustic.  Go ahead and burn around the front along the edge if you want to so that the burn acts as a frame for the block.


Step 6:  Add a hanger.

Don't forget to use hot glue to adhere a loop to the back of the ornament for hanging.  I used hemp cording.

Step 7: Sign your work.

The last thing that you should do is to sign your work.  I wood-burned my initials into the back of the wooden disks.  Add a date or the name of the recipient if you want to.

YOU ARE FINISHED!  ENJOY YOUR RUSTIC QUILT BLOCK ORNAMENTS!