Sunday, April 24, 2016

First Quilt Show in 2016

YAY!  Today was the first quilt show that I've gone to this year.  I almost went to one a couple weeks ago, but we had a freak Saturday snow storm so I ended up staying home and doing some hand-sewing that day.

Today was a PERFECT day for a quilt show.

I started the day by meeting three friends at the library for a Sunday "Sew Day."  We worked until around noon then headed over to the quilt show at the high school across town.  We had some lunch and then the fun began -- quilts and shopping.

I used to belong to the guild that sponsors this show every other year, but then I had a work conflict so couldn't attend meetings.

I thought I'd share some of the quilts that I found inspiring, although there was a wonderful assortment of quilts -- around 135 to feast my eyes on.

Sadly, I really didn't have anything to submit to the show because most everything that I've done lately has been professional in nature and was shipping shortly after completion.  But, ironically, I was represented at the show -- I quilted a baby quilt for a friend a while back and she put it in the show and included my name as the quilter -- so there!  My work was in the show.  :)


Here's Greta's adorable baby quilt!

One of the quilters who exhibited at the show had several "orphan quilts."  There wasn't much information, but I really found them wonderful.  I don't know if she started with orphan blocks and finished the top before quilting or if she started with tops and then quilted them.,  It really doesn't matter, though, because she completed them and now the quilts are happy!

Not all of the quilts in the photo were from the same quilter, but it's wonderful to see quilters honoring the past by either finishing orphans or else using up vintage fabrics in new quilts.


The next group of quilts were done by friends who submitted them for the quilt show.


 This Underground Railroad Quilt (designed by Eleanor Burns) was made by my friend Becky.  This is her first "real quilt".  She won a BLUE RIBBON!


The quilt above was done by my friend Sondra....
Love love love the fabrics and how she treated the alternate rows of FG's.


This quilt was done by my friend, Suzanne.  I love her use of the tiny red sashing strips.  They really make this quilt pop.  She told me this one will be donated for a fundraiser.


This quilt was made by Sondra's mom, Cindy.  It was a medallion quilt guild challenge last year. 
 Sew Sew pretty.


This quilt was made by my friend Vita, who is an amazing modern quilter and long arm quilter!  Gorgeous, huh?


This sweet guild won a second place ribbon.  Not bad for a child, is it?  This quilt was made by my friend Jill's daughter (Shirley's granddaughter), Taylor.  She's eight or nine, I think.


Finally, this is my friend Kristine's quilt.  It was featured in an issue of Quilter's World Magazine.  Isn't it wonderful?  The amazing swirling quilting was done by another friend and mentor, Cheryl.

 My friend Pat made sure to tell me about this quilt.  The blocks were made in the 1940's by her great-grandmother and she just finished putting them together in this quilt.  Then she hand-quilted it.  What a wonderful tribune to her great-grandmother's memory, wouldn't you say?

Well, I hope you enjoyed this peak into the 2016 Country Charms Quilt Show in Cochranton, PA.


Monday, April 18, 2016

Spring Weather Brings.....Christmas Quilts????

After months of craziness, I am hopeful that my world is going to stop spinning for a while!

And while I enjoy this little calm in the storm of my crazy mixed-up life,  I thought I'd try blogging again.

________________________________________________________________________________

As I sit here on this balmy April evening with the window open, the overhead fanning humming away, and the peepers (tree frogs) singing their very loud opera outside, I can't help but shake my head over my recent projects for Quilter's World magazine:

WINTER AND CHRISTMAS!


What?  You might ask.  What's wrong with you?  Are you nuts?

Probably, but in the meantime allow me to explain.

When it comes to designing for magazines or other publications for that matter, you are never making seasonal and holiday items during the correct time/season.  Strange, I know, but how else can the magazine/publication bring your your seasonal/holiday issues unless they're doing the upcoming winter issue in the spring and next year's spring issue in the summer? 

This may sound strange, but I take comfort in the fact that the seasons and holidays still follow in the correct order, just at different times of the year.

Okay, so right now I'm working on a set of Christmas place mats, a snowman table runner, and a snowflake table runner.  Right now.  In April.

Believe it or not, but there is an upside to working on seasonal/holiday items out of time -- by the time the season or holiday rolls around, I've already got a stash of new quilts ready to display, give as gifts, or donate to my favorite charity.  Just sayin'........

Here are some photos of Winter and Christmas quilts that I've made over the last couple years for various publications and patterns.


Friday, November 6, 2015

Shipping, Shipping, and More Shipping

HAVE YOU EVER HAD TO SHIP YOUR QUILTS?

Well, this week was all about shipping quilts for me.  I spent 2 days prepping and packing ALL of my quilts (that's 20 pieces ranging from placemats to queen-sized bed quilts) for my new quilt book. 

What an exhausting process.

It goes something like this:

1.  Cover the biggest bed in the house with a clean sheet.

2.  Lay a quilt on top, right sides up.

3.  Use many sticky lint roller sheets to go over the quilt surface. This process takes me a long time because I have several cats and they leave their hair everywhere.  No matter how much I try to keep them away from the quilts I'm working on, their hair still shows up.  Sigh.

4.  Fold quilt with right sides together.

5.  Repeat with lint roller on new area exposed.

6.  Fold.

7.  Lint rolller.

8.  Repeat (you get the picture here) until quilt is folded correctly to fit in box.

9.  Place quilt in plastic bag lined box.  I always put my quilts in a large plastic bag in case the box might get wet in transit.  Have you seen how packages are handled?

Whew -- done.......with ONE QUILT.  Now do this 19 more times.

Luckily, I started with the largest quilts so by the time I was totally worn out, I was preparing table runners and placemats.  I spread this torture out to 2 days and two boxes.

Of course, before I even prepped and packaged the quilts, I had to get all of the paperwork in order.  Then as I prepared each quilt, I had to pin a paper label to the top corner.

Once the quilts were safely folded inside the boxes, then the packing tape marathon took place.  I think I won first place....

WRITING A QUILT BOOK IS DEFINITELY NOT FOR THE FAINT-HEARTED!

Oh?  You always wanted to write a quilt book?  Well, welcome to the reality of the process -- it's not just about fame, fortune, and riches (I wish....). 

I wish I had thought to take some photos of this process, but I was totally focused on getting the task done, that I didn't even think of it.  Sorry....

So, yesterday I hauled my two big boxes of quilts to the UPS shipping center at Staples.  The boxes each weighed around 20 pounds.  When I got to the store, I went inside to get a cart.  Then the whole shipping process was over within minutes and my boxes were happily on their way to my publisher in California.  WAIT!  This momentous occasion should have been accompanied by confetti and balloons, don't you think?  But....there was nothing.  The Staples employees didn't even congratulate me or shake my hand -- NOTHING.  Oh, there was something.  I had to sign away my first unborn child to pay for the shipping and insurance.

This morning, I had the icing on the cake, so to speak --

I had another quilt to prep and package, a quilt project for Quilter's World magazine.  Will this torture ever end?

Sunday, October 25, 2015

My First Tutorial! QUILT BLOCK WOOD-BURNED ORNAMENT

My apologies for not getting to this sooner, but I was unable to spend much time on my computer for the last couple weeks due to an eye procedure.  I am healing well and almost back to my normal self, but with better eyesight.

I've been thinking about Christmas a lot lately, and have started making lists of what I want to make for gifts, what I have that needs finished, and what I need to buy.  Do you do that too?  I am definitely a list-y kind of person.

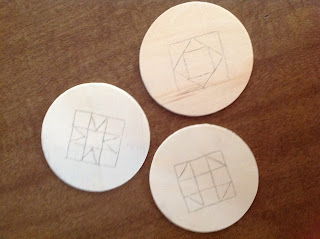
This week, I had some fun playing around with my new wood-burning tool and I thought you'd all enjoy trying out this cute quilty Christmas ornament.  If you do make one, please email me photos so I can post them.  :)

littlequilts@windstream.net

Soooooo, anyway, here's my first tutorial:

QUILT BLOCK WOOD-BURNED ORNAMENT 

Step 1:   Gather your supplies.

You will need wooden disks (mine are about 3"), a wood-burning tool, transfer paper, small quilt block line drawings (I used Electric Quilt software to make mine and they are about 1 1/2"), and a pencil (I love these stubby little pencils that I got from Ikea!).


Step 2:  Transfer the design.

Okay, now it's time to use your pencil and transfer paper to get the quilt block design onto the wooden disk.  Put your transfer paper down first, try to center your quilt block line drawing on top, and trace the lines with your pencil.


Step 3:  Burn the design.

After heating up your burning tool for the correct amount of time (hint:  look at your instructions), trace over the quilt block lines with your tool.  You may need to go over the lines more than once until you reach the right amount of burning.  Move slowly.


Step 4: Fill in the design.

Once you've burned the lines, very carefully burn the areas that you want to be the "darker fabric" in the block. You may need to burn the areas more than once to get them dark enough.  I even lightly burned the "light fabrics" because I like the look.  I also added a "fuzzy" edge around the block.


Step 5:  Burn the edges.

After you are satisfied with your block, burn the edges of the disk if desired.  I really like how it makes the block more rustic.  Go ahead and burn around the front along the edge if you want to so that the burn acts as a frame for the block.


Step 6:  Add a hanger.

Don't forget to use hot glue to adhere a loop to the back of the ornament for hanging.  I used hemp cording.

Step 7: Sign your work.

The last thing that you should do is to sign your work.  I wood-burned my initials into the back of the wooden disks.  Add a date or the name of the recipient if you want to.

YOU ARE FINISHED!  ENJOY YOUR RUSTIC QUILT BLOCK ORNAMENTS!


Tuesday, October 6, 2015

A Panel Problem

Now that the first stage of the new book is wrapped up, I've turned my thoughts and quilting in a new direction -- working on a sample for our 2016 Saturday quilt group.  Each year we tackle a different project, often some type of sampler.  Mary Lee, my co-leader, came up with a brilliant idea to combine the block book from 2015 (this year) with a quilt pattern called Starlight.


So I started working on my center panel.  Starlight is a great pattern because you can use pretty much any vertical panel -- you just need to add borders around until you get to the right dimensions which are listed in the pattern.  First, I trimmed up my panel to get ready for the first border which I decided to do little pieced squares using all of the fabrics from what I am using for my blocks.  Yes, I had to actually do the math, but I did survive.  I got the border mostly on when I discovered THE PROBLEM.

The panel was not printed straight so now my quilt center is slightly skewed.  UGH!  I've already invested enough time and energy in this project that I don't want to change midstream.  I thought that by carefully adding the remaining borders that I could correct the skew.  Although it was definitely better by the time I finished the borders around the panel, it still isn't perfect.

See what happens when I match up the top and bottom edges of the quilt?  See the big wrinkle?

Now see what happens when I straighten the quilt through the center......the edges don't meet.

With my breath held and fingers crossed, I am going to go ahead with the project as is.  Hopefully by the time I get to the outer edge, things will have straightened out.  I am counting on the forgivability that 100% cotton fabric possesses. Then with a little luck, I will be able to quilt out any remaining distortion.

Maybe the quilt will turn out just fine.

I guess we'll just have to wait and see.


Thursday, October 1, 2015

New Book, New Blog

Greetings to You and Welcome to my new blog, Quilt With a View.

This is a sunset taken from the little valley where I live.

Sadly, I lost interest with my old blog, The Orphan Quilter, last year due to a lot of different circumstances.  So instead of rehabbing it, I decided to turn over a new leaf -- er, new blog.

I have some new goals in mind for this blog, so I thought I'd put them in writing because I have found that if I write something down, it is more meaningful to me.  Does this work for you, too?

My goals:

1.   To be more proactive with my blog in order reach more people.
2.  To incorporate tutorials (since I have a variety of interests, the tutorials may not always be quilting-related).
3.   To invite guest bloggers to my space.
4.   To blog more frequently.
5.   To have fun!

Okay, now that I've got those goals actually written down, let's get started.

I decided that today was the day to start my new blog because today was the day that the rough draft of my third quilt book was due.  Of course, I, being an overachiever, actually submitted everything yesterday.  :0)

This past year was definitely full of ups and downs for me.  In 2014, I submitted a book proposal to my then-publisher, Kansas City Star, and it was accepted.  Of course, I started contacting fabric and supply companies to gather up everything I needed for the book and I jumped right into making projects.  What fun!  

Then earlier this year, I received a devastating email stating that Kansas City Star was closing and as such, they would not be publishing my book, which was slated for a Fall 2016 release.  After I ranted and raved about the unfairness of the world for a couple days, I got my head on straight and started contacting other publishers to see if anyone was interested in my now slightly-tarnished book proposal and a slightly-bruised me.  A couple publishers were interested and we began talking.

After many months, I found out that Kansas City Star and C & T Publishing made a deal so that KCS would become a C & T imprint.  This was definitely good news for me as I was already in talks with C & T.  For a long time, I heard very little about the whole process and I kept my fingers crossed, hoping that no news was indeed good news.  After tweaking my book proposal a bit to make it all shiny and new, I resubmitted it to C & T and they accepted it.  WOO HOO!

So, to make a very long story short, today was the date for submitting my rough draft (which I already did yesterday, remember?).  The quilts themselves are almost finished, which is a good thing because they will be due in about 6 weeks.  By the beginning of December, everything on my end should be wrapped up and then I get to sit back, pat myself on the back, and wait.....and wait.....and wait for that first copy to arrive.  Although there was a lot of water under the bridge, my book is still slated for a Fall 2016 release.

So, anyway....

Today, a mysterious box was left outside the garage door.  At first, we all assumed that it was a returned quilt from one of the magazines that I work with, but the box was light and rattled.  Then I saw that the return address was C & T.  Hmmm.  My curiosity was really peaked at this point and I just had to open that box.

Here's what I found inside:


A tote bag filled with awesome goodies.  It was a welcome gift from C & T!  How cool is that???!!!  Did you know that C & T did more than just publish books?  They also have their own line of fusibles/interfacings, gifty items, tools and rulers, and much much more.  They sent me a lovely assortment of thier items.  

It will be fun to try them out and tell you about them as I do, don't you think?