Showing posts with label quilt blog. Show all posts

Thursday, May 5, 2016

100 Quilt Block Blog Hop

Greetings and welcome to my blog!  I'm sew glad that you're here.

If you stopped by early this morning and my Blog Tour post wasn't up yet, I am sew sorry.  Somehow it didn't launch when it was supposed to.  Probably human error.......Thanks for checking back in.

Did you know that there's a BLOG TOUR going on right now from May 2nd until May 6th?  Did you know you can win fun quilty prizes?  Visit Quiltmaker magazine's blog, Quilty Pleasures to learn more, register for prizes, or to see the featured designers.


What fun!  It's my turn to host a block party as part of the Volume 13 Blog Tour on my blog!  WAHOO!  1....2...3.....Let's all blow our party horns!    Whoosh.....I'll throw the confetti.  Hey! Turn up the music -- loud!   Okay.......that's more like it!  Let's get the party started!  Yeah!

I am sew sew excited to be part of Quiltmaker's 100 Blocks Volume 13.  This is my first time in the magazine, although my designs have been featured in many other magazines and publications and I've authored 2 books.  I have a new book -- my third book -- coming out in November.
 Read on to find out more about it.  :)

But first......on to my block.


This is my quilt block, Cotillion, featured in Quiltmaker's 100 Quilt Blocks Volume 13.  It's block #1284 on page 51.  Additionally, it's on the front cover of the magazine.  

Can you find my block, below?


Aha!  There it is!  Second row down, fourth block from the left.

  Let me show you how I came up with the design for my Cotillion block.

When I first decided to challenge myself to create a block, I decided to start with my favorite 
quilt block, Shoofly.  I sat down with my computer and Electric Quilt 7 software to play and 
had a little fun with my Shoofly block, but one big Shoofly block wasn't very interesting. 
 Hmm.  Now what?


Then I decided to put four Shoofly blocks together to see what would happen.  Since the block would finish at 12", I made my little Shoofly blocks 6".


I knew I was on the right track, but it definitely needed a little tweaking.

What if I featured a different fabric in the center instead of the background fabric?


Better....What if I made the white squares into rectangles and the center triangles into a solid square?  This would make it easier to cut.


I was really getting excited at this point because the block was starting to come together, but it wasn't quite there yet.  Hmmm.  Maybe I should take away the triangle squares in the four corners?


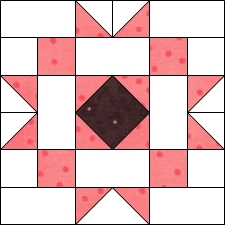
Now that's what I'm talking about!  Here is my original design.  But wait -- I need to add some fabric, don't I?   I decided to use fabric from the Samantha line by Carrie Quinn for Penny Rose Fabrics.
I had recently made a quilt using this lovely pink and brown collection and was happy to use the
leftovers for Cotillion.


Aha!  There it is!  Done!

Now that I've shown you my step-by-step process for creating my Cotillion block,
 look what happens when you put them into a quilt:

.
Here's a very traditional setting with sashing.


This is what happens when I put the blocks on-point with no sashing.  Interesting....

NEW BOOK     NEW BOOK!!!

Okay, since you're kind of a captive audience, I just wanted to take a moment and tell you about my new quilt book with C&T!  My new book is all about PRECUTS and will be out in November 2016.  There are 16+ projects ranging from table runners and place mats all the way up to big bed quilts. Shhh!  Don't tell, but you're the first to officially hear about my upcoming book -- it's called I LOVE PRECUT QUILTS!.  Great title, huh?  So ask for it at your local quilt shop in November.


  NOW FOR A GIVEAWAY!

Leave a comment on my blog anytime from May 5th until May 9th and tell me what your favorite quilt block is.  You might just win a copy of Quiltmaker's 100 Quilt Blocks Vol. 13!  Woot!  Woot! 


Now if you want a chance to win a copy of my first book, Orphan Block Quilts, become a follower and leave me a another comment letting me know that you're a follower.  


Winners will be drawn randomly on Monday, May 9th.  Please don't forget to include your email address so I can let you know that you're a winner!  YAY!  GO YOU!


Now back to your regularly scheduled programming.........................................


Sunday, October 25, 2015

My First Tutorial! QUILT BLOCK WOOD-BURNED ORNAMENT

My apologies for not getting to this sooner, but I was unable to spend much time on my computer for the last couple weeks due to an eye procedure.  I am healing well and almost back to my normal self, but with better eyesight.

I've been thinking about Christmas a lot lately, and have started making lists of what I want to make for gifts, what I have that needs finished, and what I need to buy.  Do you do that too?  I am definitely a list-y kind of person.

This week, I had some fun playing around with my new wood-burning tool and I thought you'd all enjoy trying out this cute quilty Christmas ornament.  If you do make one, please email me photos so I can post them.  :)

littlequilts@windstream.net

Soooooo, anyway, here's my first tutorial:

QUILT BLOCK WOOD-BURNED ORNAMENT 

Step 1:   Gather your supplies.

You will need wooden disks (mine are about 3"), a wood-burning tool, transfer paper, small quilt block line drawings (I used Electric Quilt software to make mine and they are about 1 1/2"), and a pencil (I love these stubby little pencils that I got from Ikea!).


Step 2:  Transfer the design.

Okay, now it's time to use your pencil and transfer paper to get the quilt block design onto the wooden disk.  Put your transfer paper down first, try to center your quilt block line drawing on top, and trace the lines with your pencil.


Step 3:  Burn the design.

After heating up your burning tool for the correct amount of time (hint:  look at your instructions), trace over the quilt block lines with your tool.  You may need to go over the lines more than once until you reach the right amount of burning.  Move slowly.


Step 4: Fill in the design.

Once you've burned the lines, very carefully burn the areas that you want to be the "darker fabric" in the block. You may need to burn the areas more than once to get them dark enough.  I even lightly burned the "light fabrics" because I like the look.  I also added a "fuzzy" edge around the block.


Step 5:  Burn the edges.

After you are satisfied with your block, burn the edges of the disk if desired.  I really like how it makes the block more rustic.  Go ahead and burn around the front along the edge if you want to so that the burn acts as a frame for the block.


Step 6:  Add a hanger.

Don't forget to use hot glue to adhere a loop to the back of the ornament for hanging.  I used hemp cording.

Step 7: Sign your work.

The last thing that you should do is to sign your work.  I wood-burned my initials into the back of the wooden disks.  Add a date or the name of the recipient if you want to.

YOU ARE FINISHED!  ENJOY YOUR RUSTIC QUILT BLOCK ORNAMENTS!


Tuesday, October 6, 2015

A Panel Problem

Now that the first stage of the new book is wrapped up, I've turned my thoughts and quilting in a new direction -- working on a sample for our 2016 Saturday quilt group.  Each year we tackle a different project, often some type of sampler.  Mary Lee, my co-leader, came up with a brilliant idea to combine the block book from 2015 (this year) with a quilt pattern called Starlight.


So I started working on my center panel.  Starlight is a great pattern because you can use pretty much any vertical panel -- you just need to add borders around until you get to the right dimensions which are listed in the pattern.  First, I trimmed up my panel to get ready for the first border which I decided to do little pieced squares using all of the fabrics from what I am using for my blocks.  Yes, I had to actually do the math, but I did survive.  I got the border mostly on when I discovered THE PROBLEM.

The panel was not printed straight so now my quilt center is slightly skewed.  UGH!  I've already invested enough time and energy in this project that I don't want to change midstream.  I thought that by carefully adding the remaining borders that I could correct the skew.  Although it was definitely better by the time I finished the borders around the panel, it still isn't perfect.

See what happens when I match up the top and bottom edges of the quilt?  See the big wrinkle?

Now see what happens when I straighten the quilt through the center......the edges don't meet.

With my breath held and fingers crossed, I am going to go ahead with the project as is.  Hopefully by the time I get to the outer edge, things will have straightened out.  I am counting on the forgivability that 100% cotton fabric possesses. Then with a little luck, I will be able to quilt out any remaining distortion.

Maybe the quilt will turn out just fine.

I guess we'll just have to wait and see.


Thursday, October 1, 2015

New Book, New Blog

Greetings to You and Welcome to my new blog, Quilt With a View.

This is a sunset taken from the little valley where I live.

Sadly, I lost interest with my old blog, The Orphan Quilter, last year due to a lot of different circumstances.  So instead of rehabbing it, I decided to turn over a new leaf -- er, new blog.

I have some new goals in mind for this blog, so I thought I'd put them in writing because I have found that if I write something down, it is more meaningful to me.  Does this work for you, too?

My goals:

1.   To be more proactive with my blog in order reach more people.
2.  To incorporate tutorials (since I have a variety of interests, the tutorials may not always be quilting-related).
3.   To invite guest bloggers to my space.
4.   To blog more frequently.
5.   To have fun!

Okay, now that I've got those goals actually written down, let's get started.

I decided that today was the day to start my new blog because today was the day that the rough draft of my third quilt book was due.  Of course, I, being an overachiever, actually submitted everything yesterday.  :0)

This past year was definitely full of ups and downs for me.  In 2014, I submitted a book proposal to my then-publisher, Kansas City Star, and it was accepted.  Of course, I started contacting fabric and supply companies to gather up everything I needed for the book and I jumped right into making projects.  What fun!  

Then earlier this year, I received a devastating email stating that Kansas City Star was closing and as such, they would not be publishing my book, which was slated for a Fall 2016 release.  After I ranted and raved about the unfairness of the world for a couple days, I got my head on straight and started contacting other publishers to see if anyone was interested in my now slightly-tarnished book proposal and a slightly-bruised me.  A couple publishers were interested and we began talking.

After many months, I found out that Kansas City Star and C & T Publishing made a deal so that KCS would become a C & T imprint.  This was definitely good news for me as I was already in talks with C & T.  For a long time, I heard very little about the whole process and I kept my fingers crossed, hoping that no news was indeed good news.  After tweaking my book proposal a bit to make it all shiny and new, I resubmitted it to C & T and they accepted it.  WOO HOO!

So, to make a very long story short, today was the date for submitting my rough draft (which I already did yesterday, remember?).  The quilts themselves are almost finished, which is a good thing because they will be due in about 6 weeks.  By the beginning of December, everything on my end should be wrapped up and then I get to sit back, pat myself on the back, and wait.....and wait.....and wait for that first copy to arrive.  Although there was a lot of water under the bridge, my book is still slated for a Fall 2016 release.

So, anyway....

Today, a mysterious box was left outside the garage door.  At first, we all assumed that it was a returned quilt from one of the magazines that I work with, but the box was light and rattled.  Then I saw that the return address was C & T.  Hmmm.  My curiosity was really peaked at this point and I just had to open that box.

Here's what I found inside:


A tote bag filled with awesome goodies.  It was a welcome gift from C & T!  How cool is that???!!!  Did you know that C & T did more than just publish books?  They also have their own line of fusibles/interfacings, gifty items, tools and rulers, and much much more.  They sent me a lovely assortment of thier items.  

It will be fun to try them out and tell you about them as I do, don't you think?