Greetings and welcome to my blog! I'm sew glad that you're here.
If you stopped by early this morning and my Blog Tour post wasn't up yet, I am sew sorry. Somehow it didn't launch when it was supposed to. Probably human error.......Thanks for checking back in.
Did you know that there's a BLOG TOUR going on right now from May 2nd until May 6th? Did you know you can win fun quilty prizes? Visit Quiltmaker magazine's blog, Quilty Pleasures to learn more, register for prizes, or to see the featured designers.
What fun! It's my turn to host a block party as part of the Volume 13 Blog Tour on my blog! WAHOO! 1....2...3.....Let's all blow
our party horns! Whoosh.....I'll throw the confetti. Hey! Turn up the
music -- loud! Okay.......that's more like it! Let's get the party started! Yeah!
I am sew sew excited to be part of Quiltmaker's 100 Blocks Volume 13.
This is my first time in the magazine, although my designs have been
featured in many other magazines and publications and I've authored 2 books. I have a new book -- my third book -- coming out in November.
Read on to find out more about it. :)
Read on to find out more about it. :)
But first......on to my block.
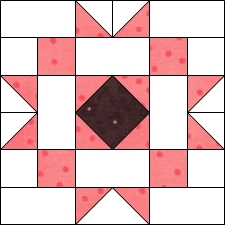
This is my quilt block, Cotillion, featured in Quiltmaker's 100 Quilt Blocks Volume 13. It's block #1284 on page 51. Additionally, it's on the front cover of the magazine.
Can you find my block, below?
Aha! There it is! Second row down, fourth block from the left.
Let me show you how I came up with the design for my Cotillion block.
When I first decided to challenge myself to create a block, I decided to start with my favorite
quilt block, Shoofly. I sat down with my computer and Electric Quilt 7 software to play and
had a little fun with my Shoofly block, but one big Shoofly block wasn't very interesting.
Hmm. Now what?
Then I decided to put four Shoofly blocks together to see what would happen. Since the block would finish at 12", I made my little Shoofly blocks 6".
I knew I was on the right track, but it definitely needed a little tweaking.
What if I featured a different fabric in the center instead of the background fabric?
Better....What if I made the white squares into rectangles and the center triangles into a solid square? This would make it easier to cut.
I was really getting excited at this point because the block was starting to come together, but it wasn't quite there yet. Hmmm. Maybe I should take away the triangle squares in the four corners?
Now that's what I'm talking about! Here is my original design. But wait -- I need to add some fabric, don't I? I decided to use fabric from the Samantha line by Carrie Quinn for Penny Rose Fabrics.
I had recently made a quilt using this lovely pink and brown collection and was happy to use the
leftovers for Cotillion.
I had recently made a quilt using this lovely pink and brown collection and was happy to use the
leftovers for Cotillion.
Aha! There it is! Done!
Now that I've shown you my step-by-step process for creating my Cotillion block,
look what happens when you put them into a quilt:
look what happens when you put them into a quilt:
Here's a very traditional setting with sashing.
This is what happens when I put the blocks on-point with no sashing. Interesting....
NEW BOOK NEW BOOK!!!
Okay, since you're kind of a captive audience, I just wanted to take a moment and tell you about my new quilt book with C&T! My new book is all about PRECUTS and will be out in November 2016. There are 16+ projects ranging from table runners and place mats all the way up to big bed quilts. Shhh! Don't tell, but you're the first to officially hear about my upcoming book -- it's called I LOVE PRECUT QUILTS!. Great title, huh? So ask for it at your local quilt shop in November.
NOW FOR A GIVEAWAY!
Leave a comment on my blog anytime from May 5th until May 9th and tell me what your favorite quilt block is. You might just win a copy of Quiltmaker's 100 Quilt Blocks Vol. 13! Woot! Woot!
Now if you want a chance to win a copy of my first book, Orphan Block Quilts, become a follower and leave me a another comment letting me know that you're a follower.
Winners will be drawn randomly on Monday, May 9th. Please don't forget to include your email address so I can let you know that you're a winner! YAY! GO YOU!
Now back to your regularly scheduled programming.........................................


